How to use PGP with Proton Mail
PGP is a proven method of protecting email communication with end-to-end encryption(new window) (which prevents emails from being read by any third parties, including your email provider). Historically, PGP was difficult to use, and impossible for most users to set up and regularly use for their own email communications.
We have built Proton Mail with PGP fully integrated, so you don’t need to take any additional steps to use PGP encryption. With Proton Mail, anyone can use PGP regardless of their technical knowledge.
All messages between Proton Mail users are automatically end-to-end encrypted. Additionally, all messages in Proton Mail inboxes are protected with PGP encryption to prevent us (or anyone else) from reading or sharing your emails, a concept known as zero-access encryption(new window).
Proton Mail can also be used to communicate with external email accounts without end-to-end encryption. While we store your emails in an encrypted format on our servers, the external email provider of the person you are emailing might have access to the emails you send. To provide end-to-end encryption between Proton Mail and external email providers, Proton Mail provides two options: Password-protected Emails(new window) and PGP encryption.
Using PGP with Proton Mail
By far the easiest way to use PGP with someone else is for both you and your contact to create a Proton Mail email address(new window). It’s free and takes less than a minute.
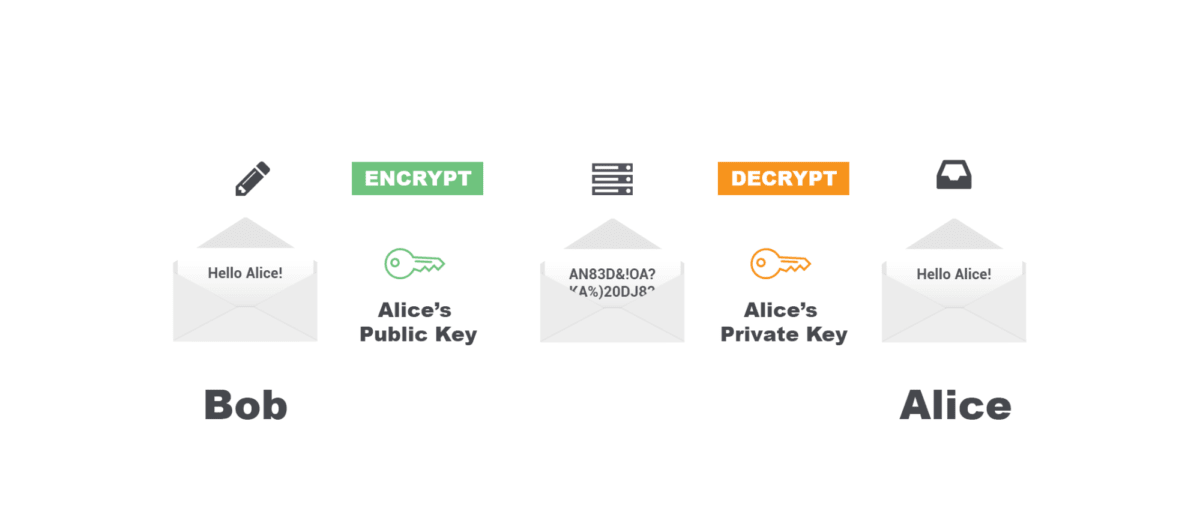
PGP works by generating a key pair: a public key and a private key. The public key can be distributed to anyone who wants to send you a message and is used to encrypt a message that can only be decrypted by you. The private key is kept secret and is used for decryption.

In addition to encryption, PGP can also create digital signatures(new window). Signatures, created with your private key, are proof that you have written the message you have signed. Using your public keys, other users can verify these signatures.
Proton Mail automatically creates digital signatures if both parties are using Proton Mail. However, if the recipient is not using Proton Mail, but does use PGP, it is possible to manually set up PGP by following the instructions below.
Sharing your public key
First, you need to share your public key with the non-Proton Mail recipient that you want to exchange encrypted emails with. The contact on the other side needs to know how to use PGP and have a PGP plugin installed in their mail client already.
Sending your Proton Mail public key is very easy:
1. Log in to your Proton Mail account at account.proton.me and compose a message from Proton Mail to the non-Proton Mail user you want to use PGP with.
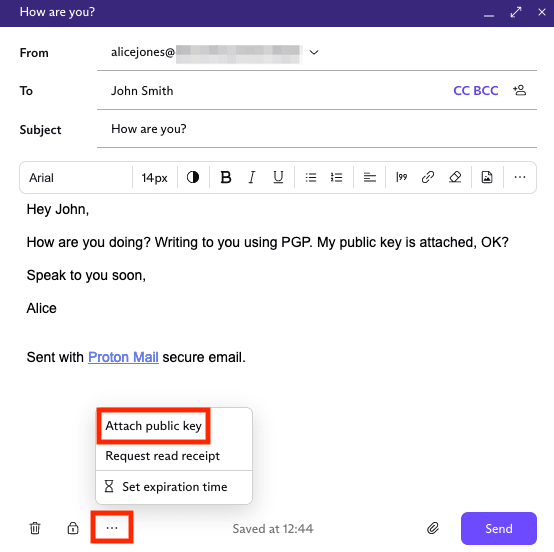
2. Click on the ellipsis menu [⋯] at the bottom left and make sure the Attach Public Key option is activated. Then compose your message, and when you click Send, your public key will be attached.

There is another way to see your public keys, allowing you to distribute them via another method if you wish. Your keys can be found in the web application under Settings → All settings ��→ Encryption and keys.
Learn more about how to download your public and private keys
It’s also possible to automatically distribute your public keys to all recipients whenever you send an email.
To set up your Proton Mail account for automatic key distribution:
1. Log in to your account at account.proton.me and go to Settings → All settings → Proton Mail → Encryption and keys.
2. Scroll down and enable the Attach public key option. This is only recommended for advanced users.

Sending PGP emails
Setting up encryption so that Proton Mail automatically encrypts messages sent to a specific non-Proton Mail recipient can either be done by either:
- manually uploading the public key of the recipient into Proton Mail’s contacts manager; or
- by asking the contact to send you an email with their public key attached.
Email with public key attached
If you get a message that is properly cryptographically signed from your contact with their public key attached, you will see something similar to this:

To enable sending PGP email to this contact, click on Trust key. In the popup, confirm that you wish to trust this key by selecting Trust key again (or Cancel to go back).

Now PGP encryption is set up between Proton Mail and the external email address and you can start sending end-to-end encrypted emails.
If your contact is digitally signing their messages, a check mark should now appear on the lock next to their email address in messages you receive from them, indicating the signature is correctly verified.

Manually uploading the public key
If your contact does not send you their public key via email, there is an alternate way to import keys through the Contacts menu.
- Go to Contacts
- Select the contact you want to configure PGP for
- Click on the Email settings icon

This icon will reveal the email settings menu.
To upload a public key, click Show advanced PGP settings and then click on the Upload button under Public Keys. This will open a window that allows you to select a PGP key from your computer.

After uploading your key the Encrypt button becomes enabled. (Note that if you upload an expired key, it is not possible to enable PGP encryption.)

The cryptographic scheme determines how the message is sent and what content types are supported. In general, we advise using PGP/MIME because it offers an additional privacy benefit.
Learn more about PGP/MIME and PGP/Inline
Final tips
Setting up PGP encryption is not simple and not for the faint of heart. It requires work from both you and the contact you are communicating with. For this reason, if you would like to use PGP encryption to communicate with someone, we highly recommend that both you and your contact create Proton Mail accounts (it’s free) and let our software take care of these complex operations for you automatically.
However, if your contact is unable or unwilling to create a Proton Mail account, Proton Mail’s built-in PGP integration gives you the most user-friendly PGP experience possible. If you have any questions or problems, you can contact our support team(new window).
