Learn how to stop unwanted emails on Gmail, Outlook, Proton Mail, and other major email services.
Whether to stop spam, prevent phishing, block a stalker, or just better control your overflowing inbox, we all need to block unwanted messages at times. Learn how below.
Why block emails?
Block, filter, or unsubscribe?
How to block emails on Gmail
Web
Android or iPhone
How to block emails on Outlook
Web
Desktop
Android or iPhone
How to block emails on Proton Mail
Web
iPhone or iPad
How to block emails on Yahoo Mail
Web
Android or iPhone
How to block emails on Apple Mail
Mac
iPhone or iPad
How to block emails on Thunderbird
Other ways to block emails
Block emails FAQs
Why block emails?
You may want to block emails from specific senders or whole domains (@domain-name.com) for various reasons. Here’s why.
Beat spam
Unsolicited and unwanted emails, also known as spam, are annoying and can contain fraudulent or malicious software (malware(nieuw venster)). Blocking individual senders or domains that send spam is one way to stop it.
Prevent phishing
Phishing emails try to trick you into revealing sensitive data or downloading malware, often leading to identity theft, credit card fraud, or other cybercrime. Blocking suspicious emails can help protect you from falling victim.
Block abuse
If you receive abusive or threatening messages, blocking the sender can provide relief. Most email providers allow you to automatically direct emails from certain senders to your spam folder or block them altogether by deleting them.
Stop marketing
You may be swamped by marketing emails or no longer want to receive that weekly newsletter. Blocking the sender or unsubscribing can help reduce junk in your mailbox.
Take control
Has the constant influx of countless messages made your inbox unmanageable? Blocking, filtering, or unsubscribing from emails can help you take back control and see only the messages you want.
Block, filter, or unsubscribe?
How you stop unwanted emails from reaching your inbox depends on your situation and preferences.
Block
Blocking emails means setting up a filter or rule so that messages from a particular sender or domain are sent straight to your spam folder or trash. Unlike unsubscribing, senders can’t see that you’ve blocked them. So blocking is better for your privacy and for dealing with suspicious messages or senders you don’t trust.
Filter
Filtering means creating rules so incoming messages are sorted based on certain criteria. For example, you can sort all sports newsletters into a “Sport” folder. Filtering emails can help you organize your incoming emails and file away unwanted or low-priority messages.
Unsubscribe
Unsubscribing is typically used for newsletters or marketing emails that you no longer want to receive. If the message is legitimate, it should contain an “unsubscribe” link. But before clicking, check for signs of phishing. If the message looks suspicious, block the sender instead to protect your privacy and security.
How to block emails on Gmail
Block emails on the Gmail web app
- Log in to your Gmail account.
- Open a message from the sender you want to block.
- Click the vertical three dots menu at the top right, and select Block [sender name].
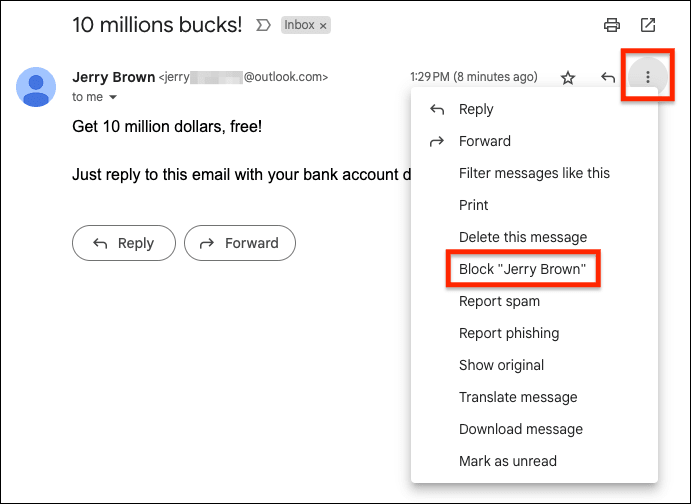
- Click the Block button.
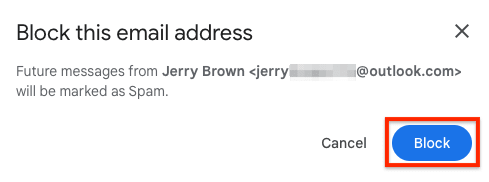
Gmail will send future messages from that sender straight to your spam folder. If you blocked someone by mistake, you can unblock them using the same steps and choosing Unblock.
You can also block messages from any address at a certain domain (@domain.com):
- Click the Show search options adjustment icon at the top.

- Add the domain name you want to block in the From field and click Create filter.
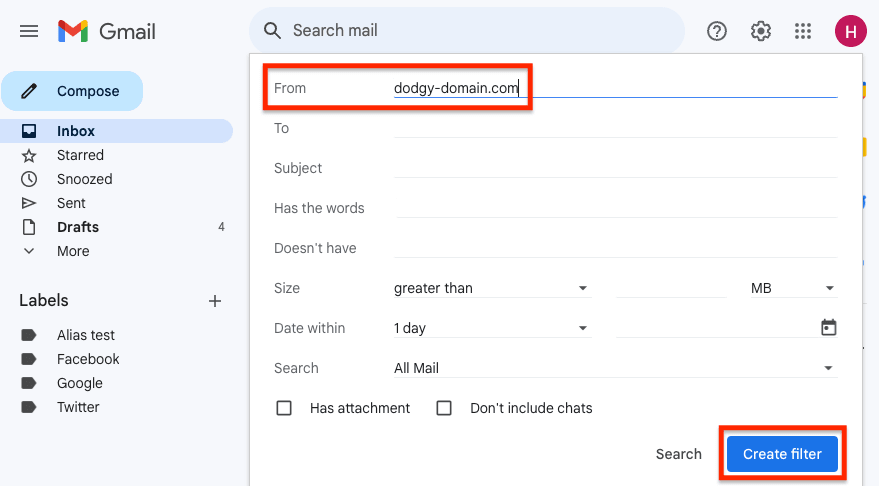
- Check the Delete it box, and click Create filter.
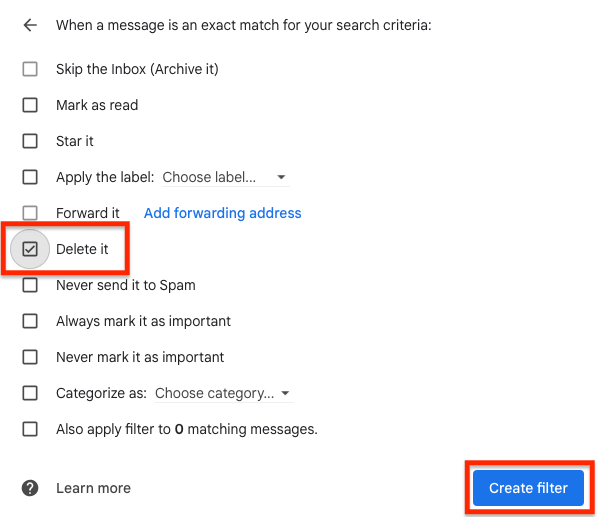
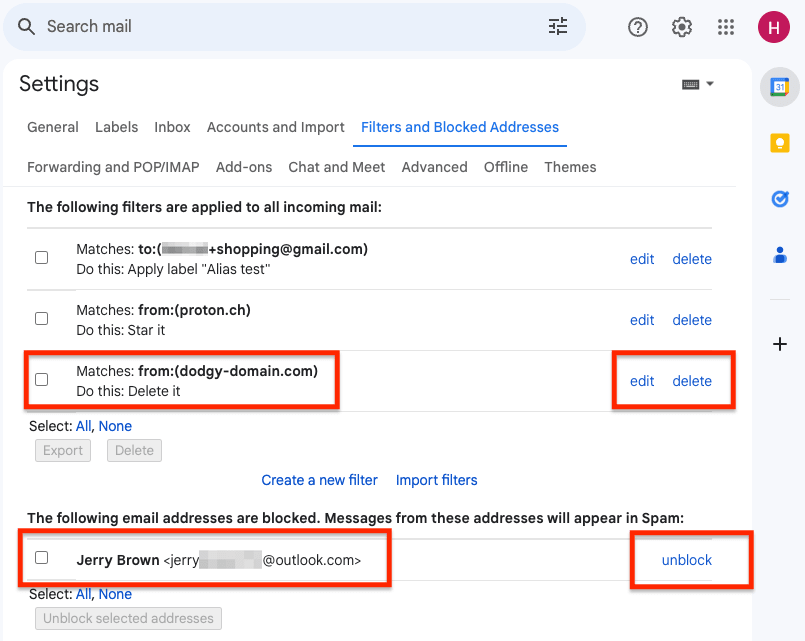
To check which messages you have blocked or filtered, go to Settings → See all settings → Filters and Blocked Addresses. Here you can edit filters or unblock addresses by deleting filters.
Block emails on Gmail for Android or iPhone
- Open the Gmail app on your Android device or iPhone.
- Open a message from the sender you want to block.
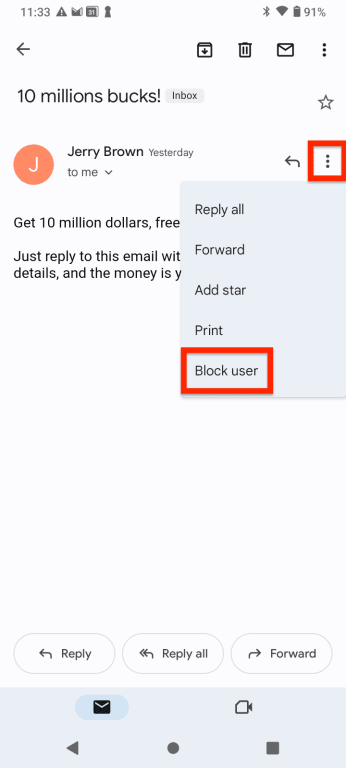
- Click the vertical three dots menu at the top right (horizontal three dots on iPhone), and select
- Block user on Android (screenshot below)
- Block [sender name] on iPhone
How to block emails on Outlook
Block emails on the Outlook web app
- Log in to your Outlook account.
- Open a message from the sender you want to block.
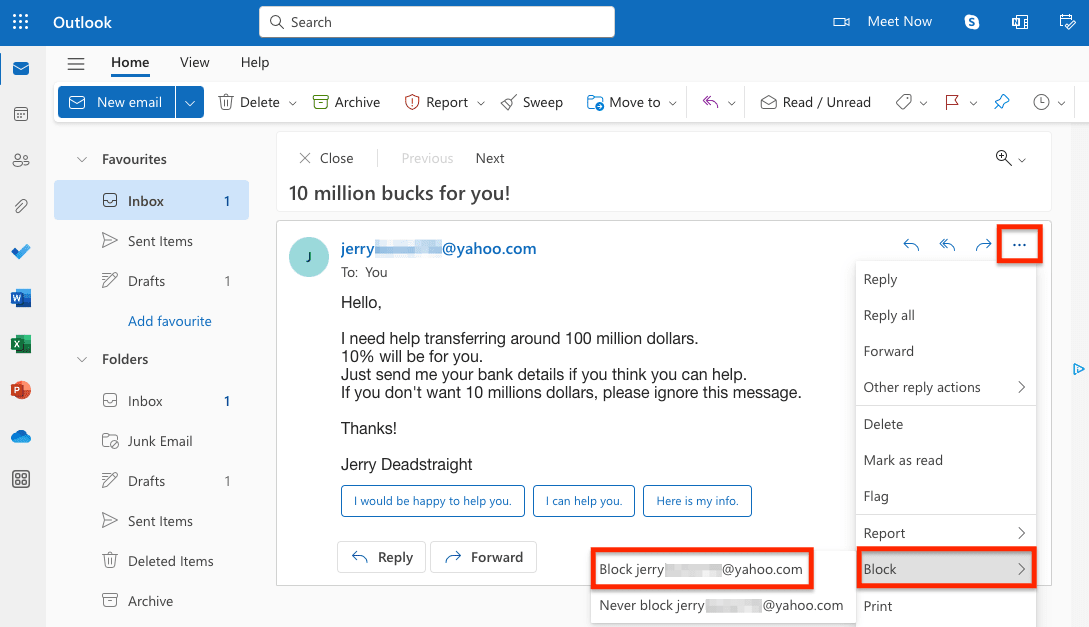
- Click the three horizontal dots menu, and select Block → Block [sender address].
You can also block senders in your settings:
- Go to Settings → View all Outlook settings.
- Select Email → Junk email, and under Blocked senders and domains, click + Add.
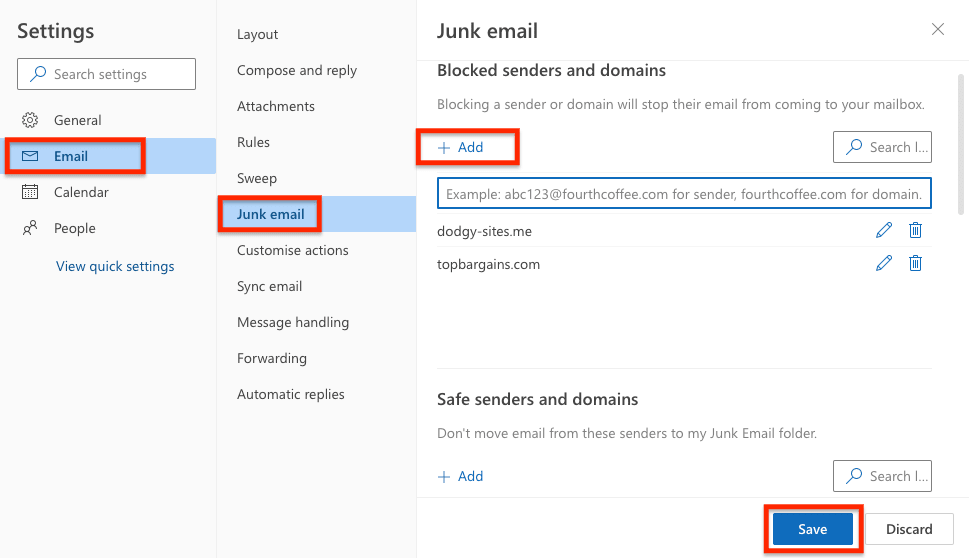
- Add the email addresses or domains you want to block.
- Hit Enter on your keyboard, and click the Save button at the bottom right.
Here you can also edit your blocked senders list or remove senders from the list.
Block emails on Outlook for desktop
To block emails on the Outlook desktop app on Windows:
- Open the Outlook desktop app.
- Open a message from the sender you want to block.
- In the top toolbar, click Junk → Block Sender.
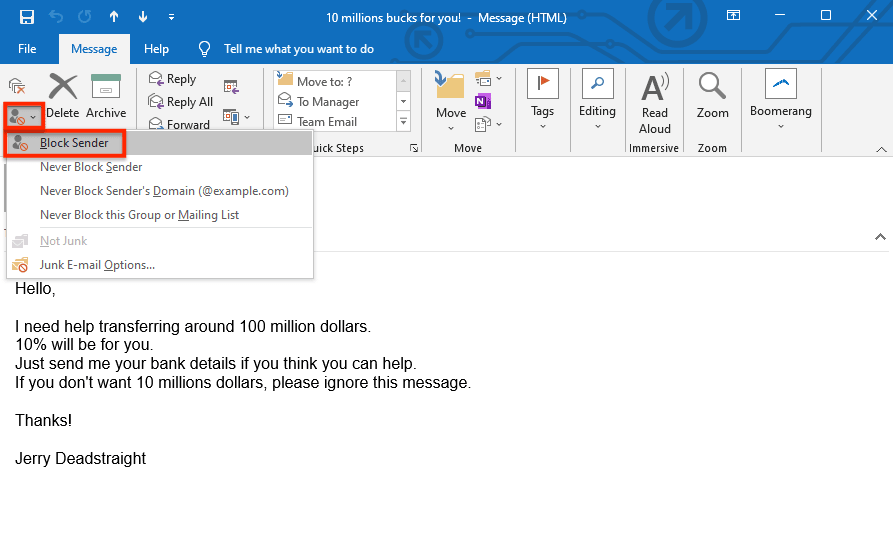
To manage your Blocked Senders list, go to Junk → Junk E-mail Options → Blocked Senders tab, where you can add, remove, or edit items in your list.
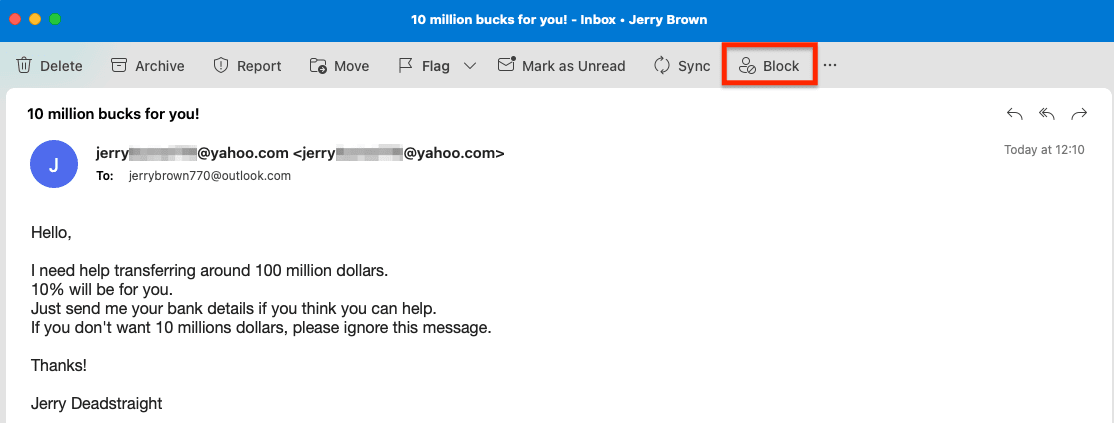
If you’ve got Outlook for Mac, you can block a sender by selecting or opening the message and clicking Block in the top menu.
Block emails on Outlook for Android or iPhone
- Open the Outlook app on your Android device or iPhone.
- Open a message from the sender you want to block.
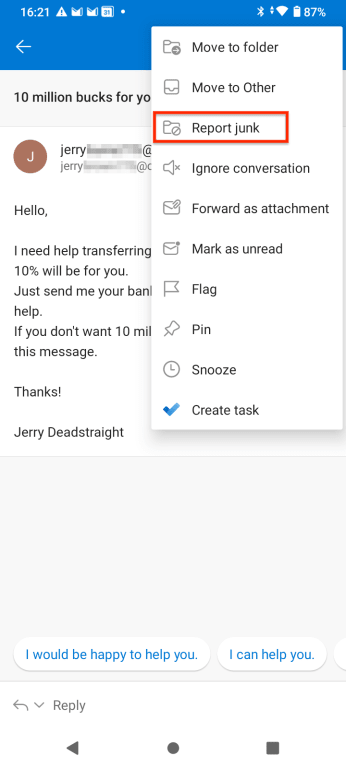
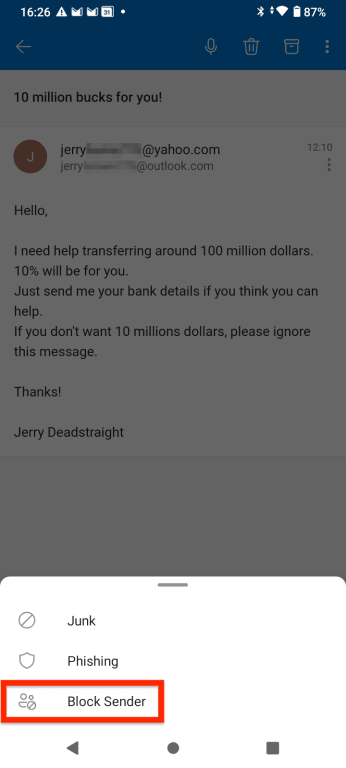
- Tap the top vertical three dots menu (horizontal three dots on iPhone) and tap Report junk → Block Sender.
How to block emails on Proton Mail
Block emails on the Proton Mail web app
- Sign in to your Proton Account at mail.proton.me(nieuw venster).
- Open an email from the sender you’d like to block.
- Select the sender’s name and address in the From field and click Block messages from this sender in the dropdown menu.
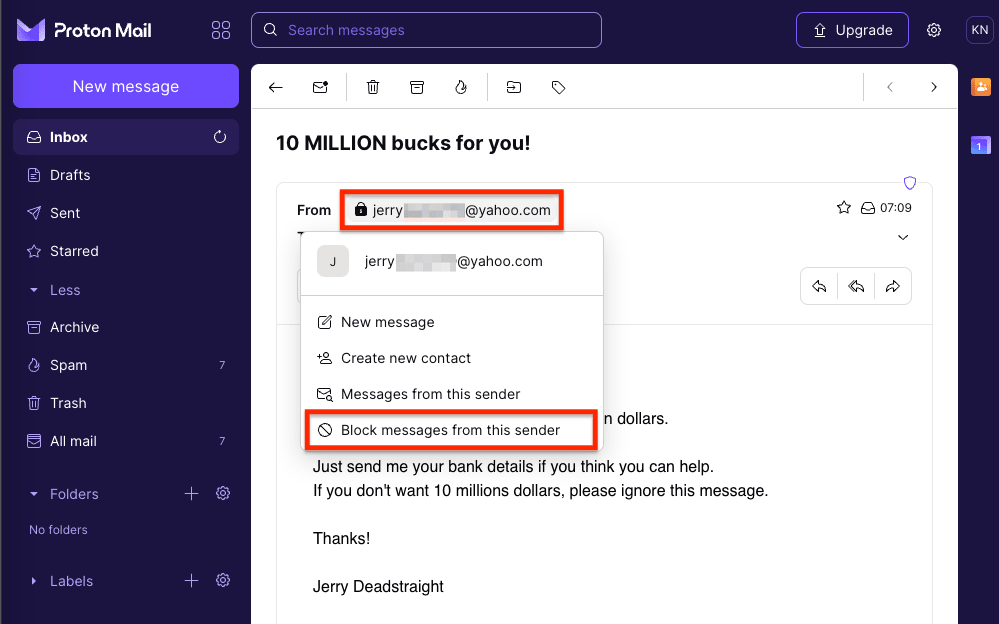
- Click Block to confirm.

The block will apply across all platforms, including the Proton mobile apps.
You can also manage your block list by going to Settings → All settings → Filters → Spam, block, and allows lists. You can block a sender using their email address, block all senders from an email domain, or unblock a sender.
To unblock a sender:
- Go to Settings → All settings → Filters → Spam, block, and allow lists, and find the sender you’d like to unblock.
- Click the horizontal three dots menu in the Edit column and select Delete (or Spam or Allow if you want to move the sender to one of those lists instead).

Learn more about how to block unwanted emails in Proton Mail
For more granular control, you can create custom filters to sort or delete unwanted mail. If you have technical experience, you can also use advanced custom filters for maximum flexibility in managing your inbox.
Block emails on Proton Mail for iPhone or iPad
You can block a sender on the Proton Mail apps for iPhone or iPad, and the block will apply across all Proton Mail platforms, including the Proton Mail Android app. (Note: You can’t currently block a sender using the Proton Mail Android app.)
- Open the Proton Mail app on your iPhone or iPad.
- Open an email from the sender you’d like to block.
- Tap the sender name to expand details.
- Tap the sender address and select Block sender in the dropdown menu.
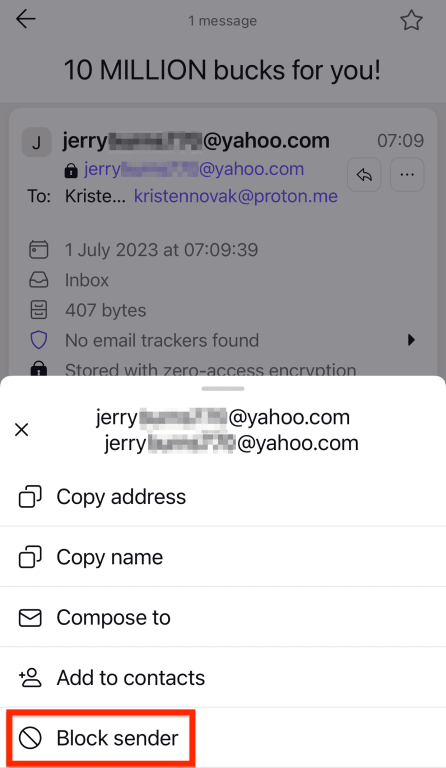
- Tap Block to confirm. All future incoming emails from this sender will now automatically be blocked.
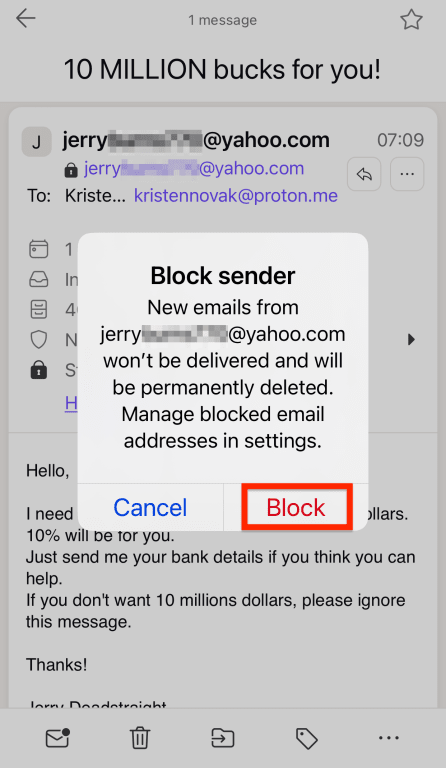
To unblock a sender:
- Tap Settings → Account settings → Mailbox → Block list.
- Tap Edit at the top right.
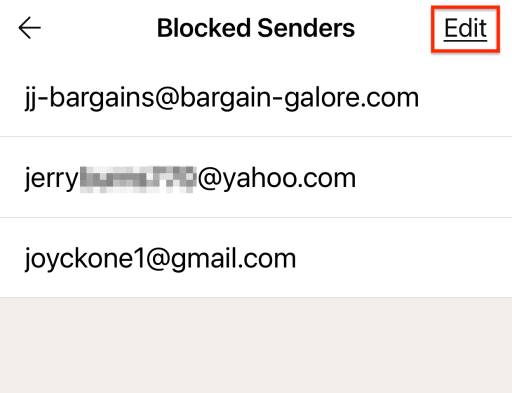
- Select the sender you want to unblock and tap the remove button next to it.
How to block emails on Yahoo Mail
Block emails on the Yahoo Mail web app
- Log in to your Yahoo Mail account.
- Open a message from the sender you want to block.
- Click the horizontal three dots menu at the top right, and select Block senders.
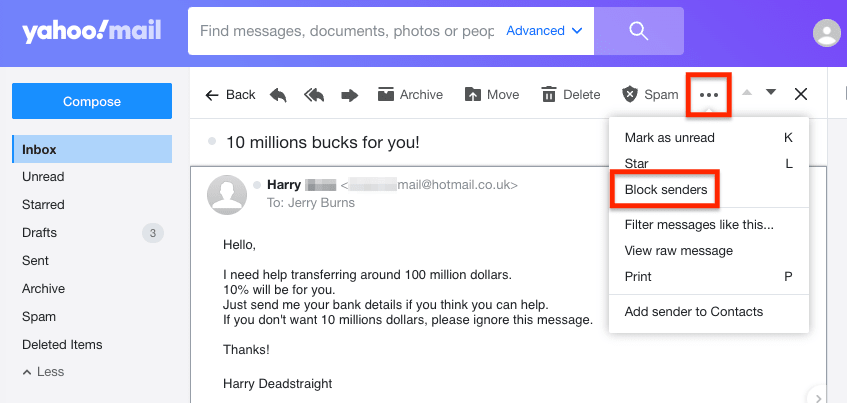
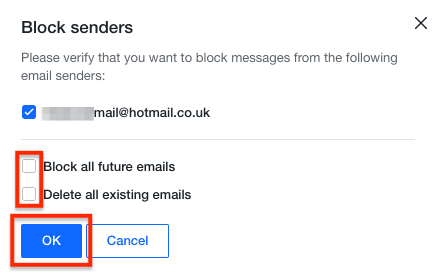
- Then check the boxes Block all future emails and Delete all existing emails (if you want to delete the messages you’ve already received from the sender), and click OK.
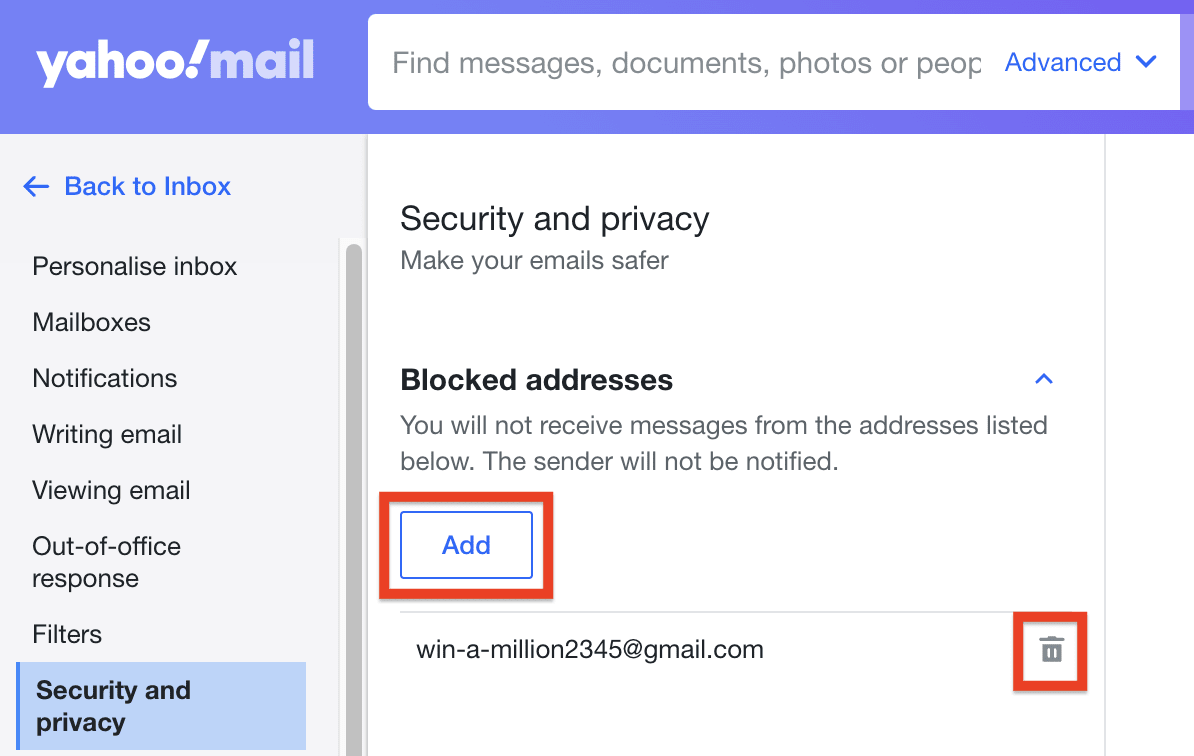
You can also block or unblock a sender or domain by going to Settings → More settings → Security and Privacy. Under Blocked addresses or Block unwanted sender domains, click:
- The Add button to add an address or domain to block
- The trash icon next to an address or domain you want to unblock
Block emails on Yahoo Mail for Android or iPhone
- Open the Yahoo Mail app on your Android device or iPhone.
- Open a message from the sender you want to block.
- Tap the More menu at the bottom right (three vertical dots on Android; three horizontal dots on iPhone), and select:
- Spam on Android
- Mark as spam on iPhone
How to block emails on Apple Mail
Block emails on Apple Mail for Mac (macOS)
- Open the Mail app on your Mac.
- Open a message from the sender you want to block.
- Click the dropdown menu next to the sender’s name, and select Block Contact.
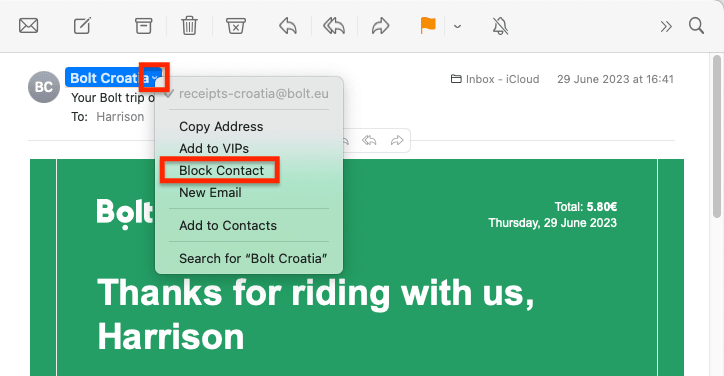
To unblock senders, click the same dropdown menu and select Unblock Contact.
You can also block and unblock senders in settings:
- Go to Settings → Junk Mail, and select the Blocked tab.
- Add or remove senders to your blocked senders list by clicking the plus (+) or minus (–) sign.
Block emails on Apple Mail for iPhone or iPad
- Open the Mail app on your iPhone or iPad.
- Open a message from the sender you want to block.
- Tap the sender’s name in the From field.
- Select Block this Contact.
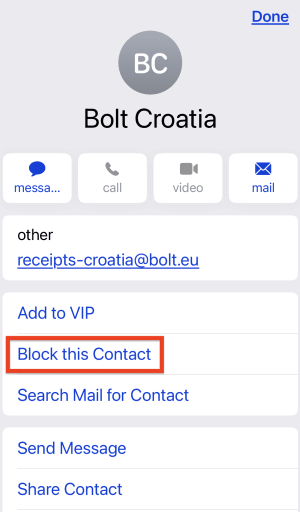
To unblock someone, click on the sender’s name in the From field and select Unblock this contact.
You can also add or remove senders from your blocked list by going to Settings → Mail → Blocked and tapping Edit or Add New.
If you want to change what happens to blocked messages, go to Settings → Mail → Blocked Sender Option and select Move to Bin or Leave in Inbox.
How to block emails on Thunderbird
Unlike most other desktop email clients, Thunderbird doesn’t give you the option to block messages from specific senders or domains. But you can create a filter and set up a blocked senders list as follows:
- Open the Thunderbird app on your computer (PC or Mac).
- Open a message from the sender you want to block.
- Right-click the sender’s address and select Create Filter From.
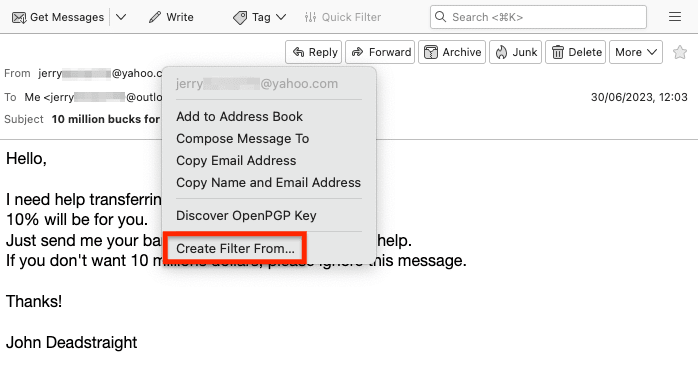
- Type in a filter name, for example, Block list. The address you want to block will be automatically filled in.
- Under Perform these actions, choose either Delete Message or Set Junk Status to … Junk.
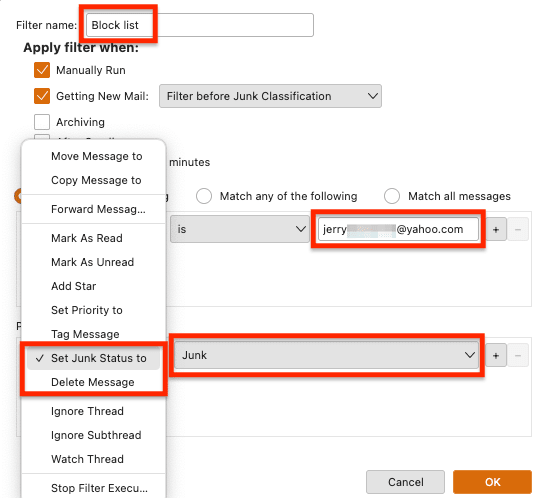
- Select OK to save the filter.
Once you’ve created your Block list filter, the next time you want to block someone, you can add their address by clicking the plus button (+).
If you want to block all messages from a domain (for example, @domain-name.com), you can add the domain name instead of the email address.
To unblock senders or domains:
- Go to the Tools menu at the top and select Message Filters.
- Select Block list (or the name you’ve given your blocked senders filter) and click Edit.
- Click the minus sign (–) next to the sender you want to unblock.
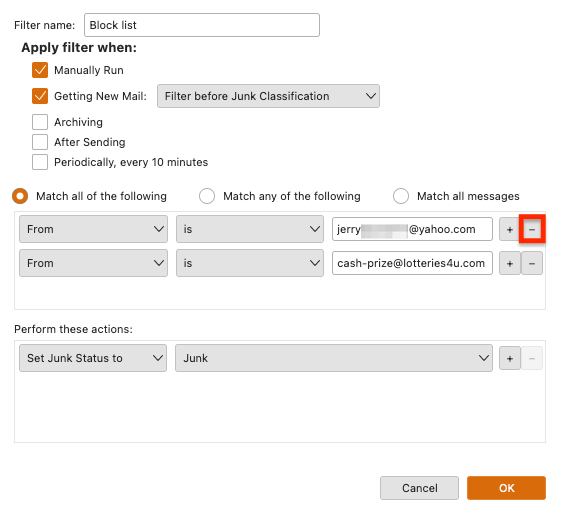
Note that Thunderbird message filters are account-specific, so when you set up a filter, make sure you’re setting it up for the correct account.
Other ways to block emails
If you want to protect your privacy but don’t want to stop receiving emails from a sender, you can use email aliases to hide your personal email address.
When you sign up for a new online account or newsletter, you can create a unique email alias that instantly forwards all incoming emails to your personal email address.
If you ever want to stop receiving unwanted emails from a sender, you simply deactivate that alias. At no point is your real email address revealed.
We’ve designed Proton Mail to give you maximum flexibility to filter messages and generate aliases for your privacy and security:
- Spam, block, and allow lists let you manage blocked senders and spam and ensure you receive important emails.
- Custom filters and Sieve filters give you granular control over incoming mail to block and sort senders.
- The Unsubscribe button lets you unsubscribe to newsletters easily, and link confirmation gives you an extra layer of protection when you click on unsubscribe links.
- Proton Pass, our encrypted online identity manager, lets you generate hide-my-email aliases to protect your personal email address.
Sign up for Proton Unlimited to get Proton Mail, Proton Calendar, Proton Drive, Proton VPN(nieuw venster), and Proton Pass with unlimited hide-my-email aliases.
Or if you’re just looking to try secure, private email, get Proton Mail for free. Join us and stay secure!
Block emails FAQs
What happens when you block a sender?
When you block a sender, any messages they send you in the future go straight into your spam folder or are deleted, depending on the service you use and the options you choose. Blocking a sender doesn’t prevent them from sending you emails.
Do senders know you’ve blocked them?
No, the sender won’t receive any notification that you’ve blocked them. But they may guess they’re on your block list and try changing their email address to reach you.
Can you block any email from an organization or just specific senders?
With most email services, you can block emails from individual senders or domain names (@example-domain.com). By blocking an organization’s domain name, you can stop emails from anyone at that organization.
Can you block emails from someone permanently?
If you block an email address or domain name, all future emails from that person or domain will either go to your spam folder or be deleted, depending on the service you use and the options you choose. However, a determined sender can always change their email address to evade your block.


