How to scheduled emails in Proton Mail (Schedule send)
With Proton Mail, you can schedule emails to be sent at a later date. Write emails whenever it suits you, like outside of working hours or over the weekend, and ensure they’re sent at a time that works best for your recipient, so they can have the most impact.
This article covers:
How to schedule an email
Scheduling an email on the Proton Mail web app
1. Open the desktop app or sign in to your Proton Mail inbox at mail.proton.me(nowe okno).
2. Select New message at the top left to open your composer.
3. Enter the recipient’s email address in the To field, add a subject line, and compose your email.
Note: You can’t schedule an email without an email address in the To field.
4. To schedule your email, click the down arrow ⌄ next to the Send button and select a predefined sending time. Your email will then be sent.
5. If you have a paid Proton plan, you can select a custom sending time. A confirmation popup will appear in which you can select the date and time you would like the email to be sent. Once you’re all set, click Schedule message.
Note: When scheduling your email, choose the date and time based on your time zone. For example, if you’re in Taipei and want to schedule an email to arrive at 2 PM in Geneva, you should schedule your email for 8 PM. (As Taipei is six hours ahead of Geneva.)
6. Once your message is scheduled click Schedule message, a black confirmation message will appear at the bottom of your screen to confirm the date and time your email will be sent.
7. Your email will now be sent at your specified time and date.
Note: Once an email is scheduled, you can cancel or edit the email before the send time.
Scheduling an email on Android, iOS, or iPadOS
1. Open the app and tap the compose button.
2. Enter the recipient’s email address in the To field, add a subject line, and compose your email.
Note: You can’t schedule an email without an email address in the To field.
3. To schedule your email, tap the Clock icon next to the Send button.

4. Chose a preselected date and a time you would like the email to be sent, or select Custom if you have a paid Proton Mail plan.

5. Once you select a time, a confirmation message will appear at the bottom of your screen to indicate the date and time your email will be sent.

6. Your email will now be sent at your specified time and date.
Note: Once an email is scheduled, you can cancel or edit the email before the send time.
How to view or edit a scheduled email
Viewing or editing a scheduled email on the desktop
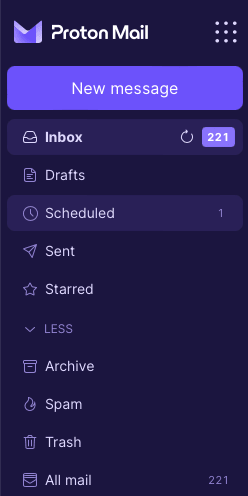
1. After scheduling a message (see the steps above), you can view your scheduled message by going to Scheduled in the menu on the left. This will open a list of all your scheduled emails.

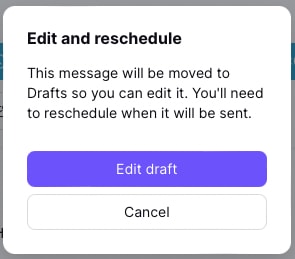
2. Click on the scheduled email you wish to view. This will open it in the message viewer. To edit your scheduled email, click Edit.

Then Click Edit draft to edit the email.

Note: When you edit a scheduled email, your email will be converted to a draft. You’ll have to reschedule the email to send it again.
Viewing or editing a scheduled email on mobile
1. After scheduling a message (see the steps above), you can view your scheduled message by going to Scheduled in the left-hand menu. This will open a list of all your scheduled emails.

2. Tap on the scheduled email you wish to view. This will open it in the message viewer. To edit your scheduled email, tap Edit.

Note: To edit a scheduled email, your email will be converted to a draft. You’ll have to reschedule the email for it to be sent at the time and date you require.
How to cancel a scheduled email
You can cancel a scheduled email any time before the time and date specified for sending.
Canceling a scheduled email on the desktop
Note: To cancel a scheduled email immediately after scheduling it, you can click Undo in the black confirmation bar that appears for a few seconds after scheduling your email.
1. To cancel a scheduled email later, you can view your scheduled messages by going to Scheduled in the left-hand menu.

2. Click on the scheduled email you wish to cancel. This will open it in the message viewer.

3. To cancel the email, you can either move it to Trash by clicking the Trash icon or click Edit, which will move it to drafts and cancel the scheduled time and date.
Canceling a scheduled email on mobile
Note: To cancel a scheduled email immediately after scheduling it, you can tap Undo in the black confirmation bar that appears for a few seconds after scheduling your email.

1. To cancel a scheduled email later, you can view your scheduled messages by going to Scheduled in the left-hand menu. This will open a list of all your scheduled emails.

2. Click on the scheduled email you wish to view. This will open it in the message viewer. To cancel the email, you can either move it to Trash by clicking the Trash icon or click Edit, which will move it to drafts and cancel the scheduled time and date.
