How to share a calendar with Proton Mail users
If you have a paid Proton Mail plan, you can share calendars you create in Proton Calendar using the Proton Calendar web app.
You can’t share a Proton Calendar using our mobile apps at this time, although any calendars you add via the Proton Calendar web app will appear in our mobile apps.
You can share calendars in two ways:
- Share a calendar with anyone: Anyone with the shared calendar link can view the calendar. Only you can create and edit events.
- Share a calendar with Proton Mail users: Only those you invite with their Proton Mail addresses can view or edit the calendar, depending on their permission. This is the more secure calendar-sharing option because you share the calendar encryption key with individual Proton users.
In this article, we explain how to share a calendar with Proton Mail users. If you want to share a calendar with anyone, see how to share a calendar via a link.
How to share a calendar with Proton Mail users
Share a calendar from the sidebar
Share a calendar from the calendar settings
How to accept a shared calendar invitation
View and Edit permissions
What’s View?
What’s Edit?
How to change View and Edit permissions
How to stop sharing a calendar
Shared calendars after resetting your password
How to share a calendar with Proton Mail users
There are two ways you can share a calendar with Proton Mail users:
- From the sidebar
- From the calendar settings
Share a calendar from the sidebar
1. Log in to Proton Calendar at calendar.proton.me(nieuw venster).
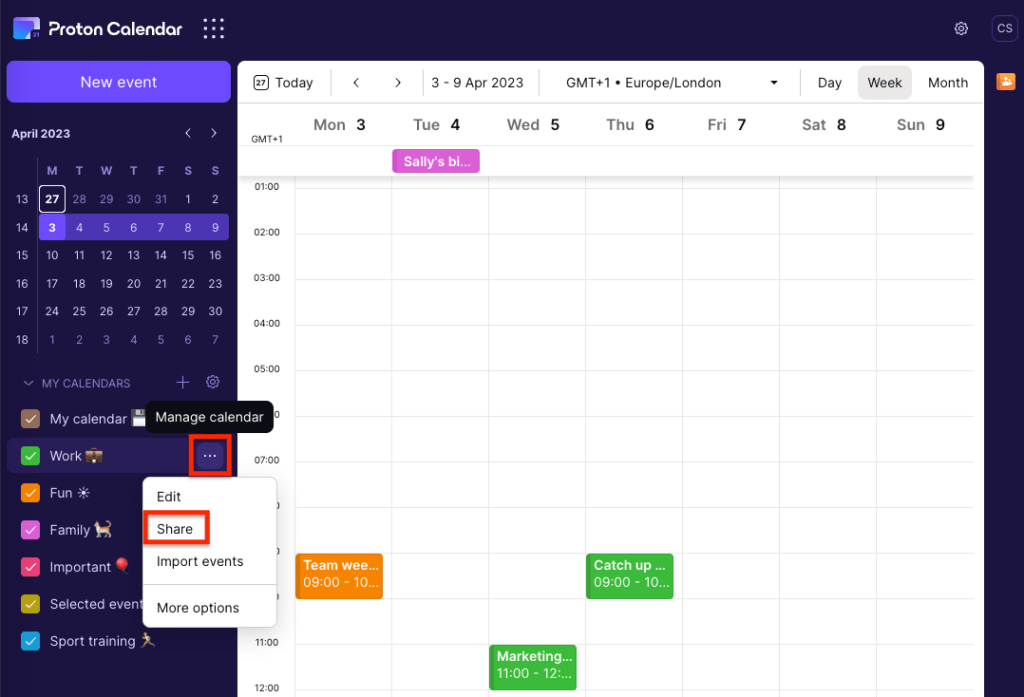
2. Click the horizontal three dots Manage calendar icon next to the calendar you want to share and select Share.
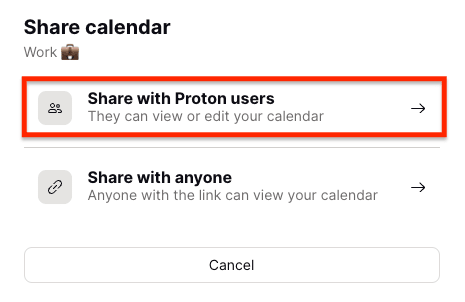
3. Click Share with Proton users.
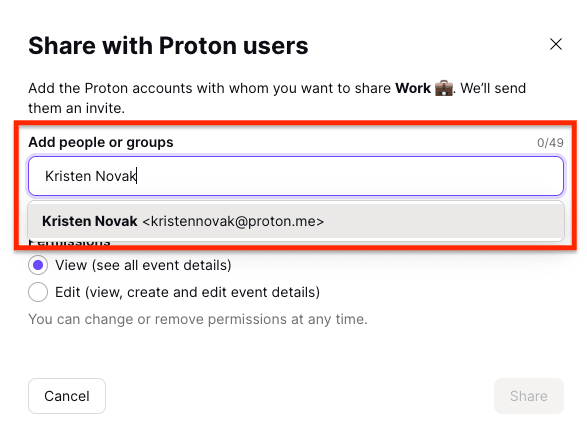
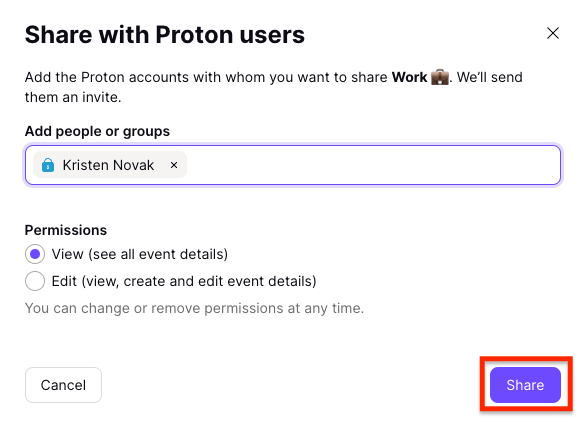
4. Enter a name, email address, or contact group that you want to share the calendar with. You can add up to 49 addresses.
5. Select one of the following permissions:
- View: The people invited can only view events.
- Edit: The people invited can view, create, edit, and delete events.
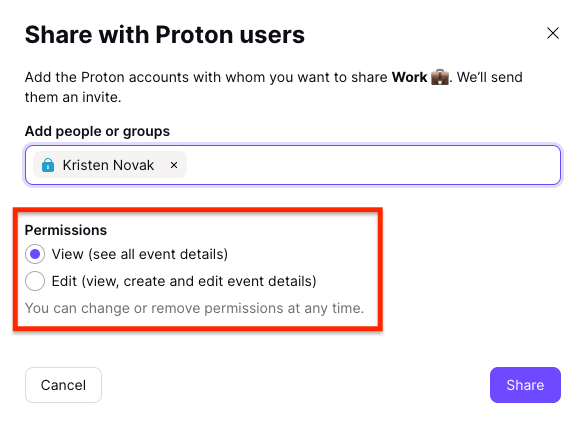
The option you choose will apply to everyone invited to join the calendar. If you want to give someone you’re inviting a different calendar permission, you can change their permission in the list of calendar members after you’ve shared the calendar (see step 8 below).
6. Click Share, and an invitation will be sent to everyone invited.
The person receiving the invitation will need to accept it to access the shared calendar.
Learn how to accept a shared calendar invitation
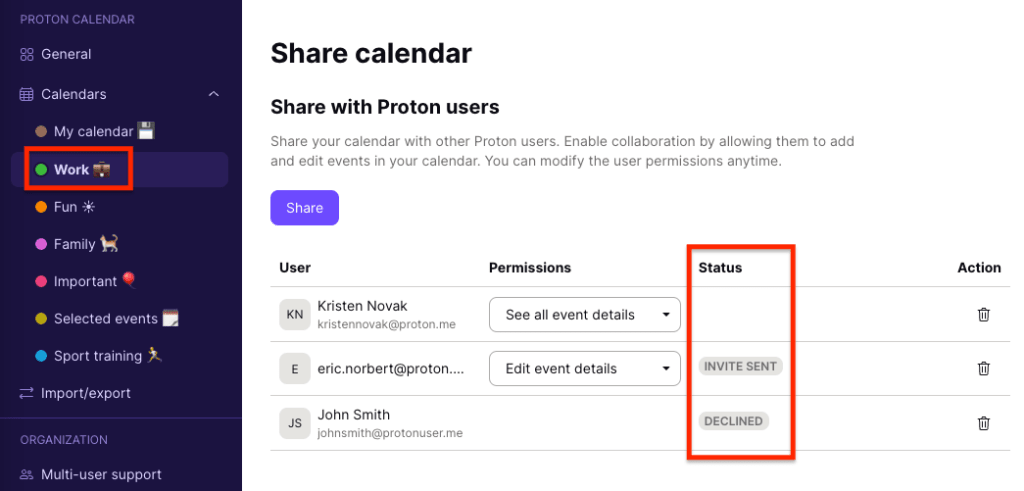
7. Once you’ve sent your invitation(s), you’ll see a list of the people invited under Share calendar in the calendar settings.
The list will show the status of the invitation (invite sent or declined). If no status appears next to a user (for example, Kristen Novak below), that user has accepted the invitation.
8. You can change the calendar permission for individual members by choosing one of the following options in the Permissions column:
- See all event details [View]: The person can only view events.
- Edit event details [Edit]: The person can view, create, and edit events.
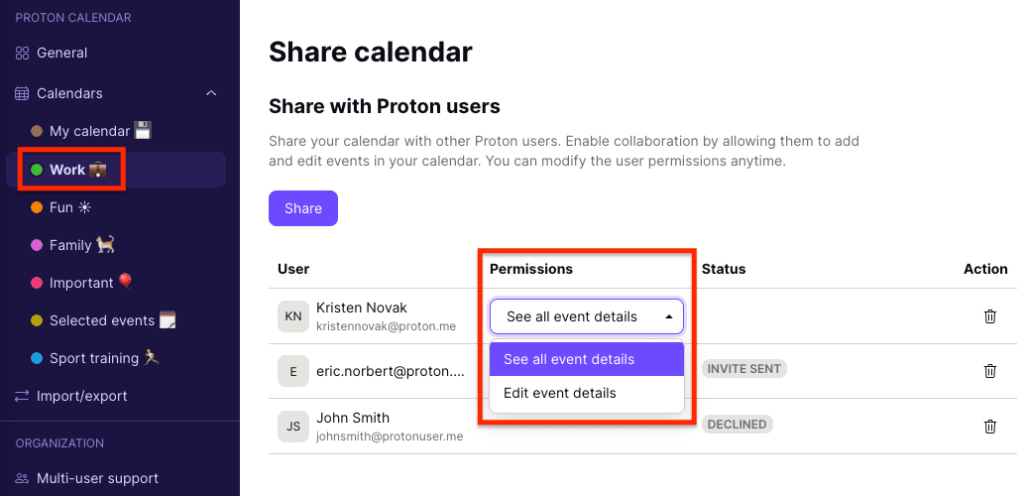
When you change a calendar member’s permission to view or edit, they receive an email letting them know their new calendar permission.
Share a calendar from the calendar settings
1. Log in to Proton Calendar at calendar.proton.me(nieuw venster).
2. Click Settings → All settings → Calendars → [name of the calendar you want to share]. Or you can click the Settings icon next to the calendar.
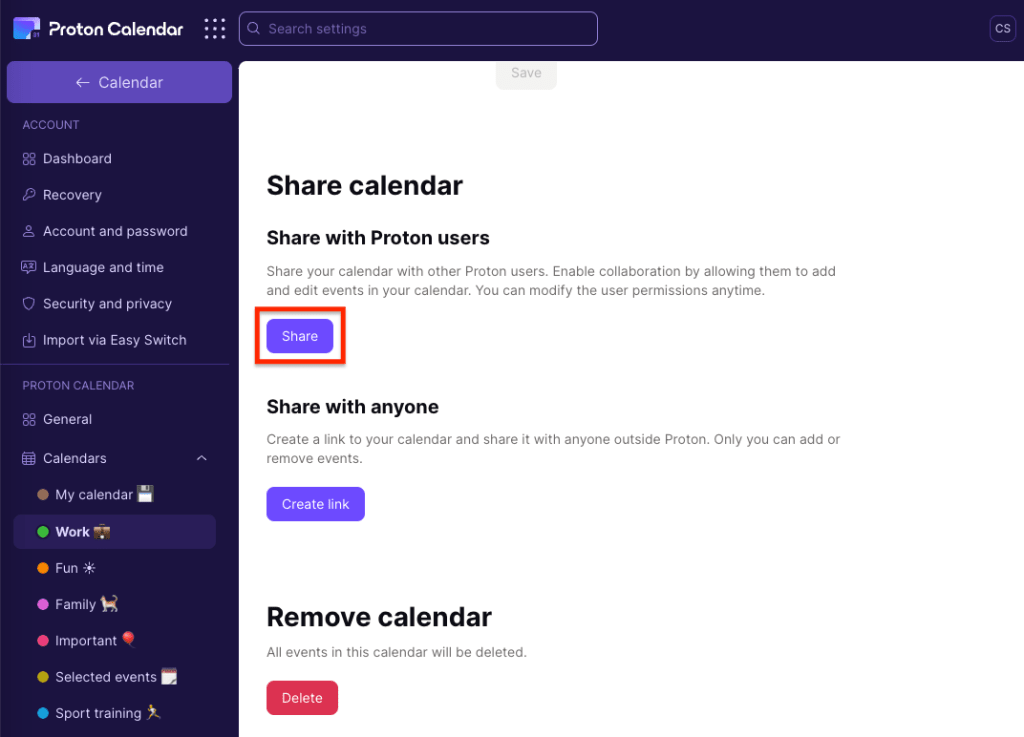
In this example, we’re sharing the calendar called Work.
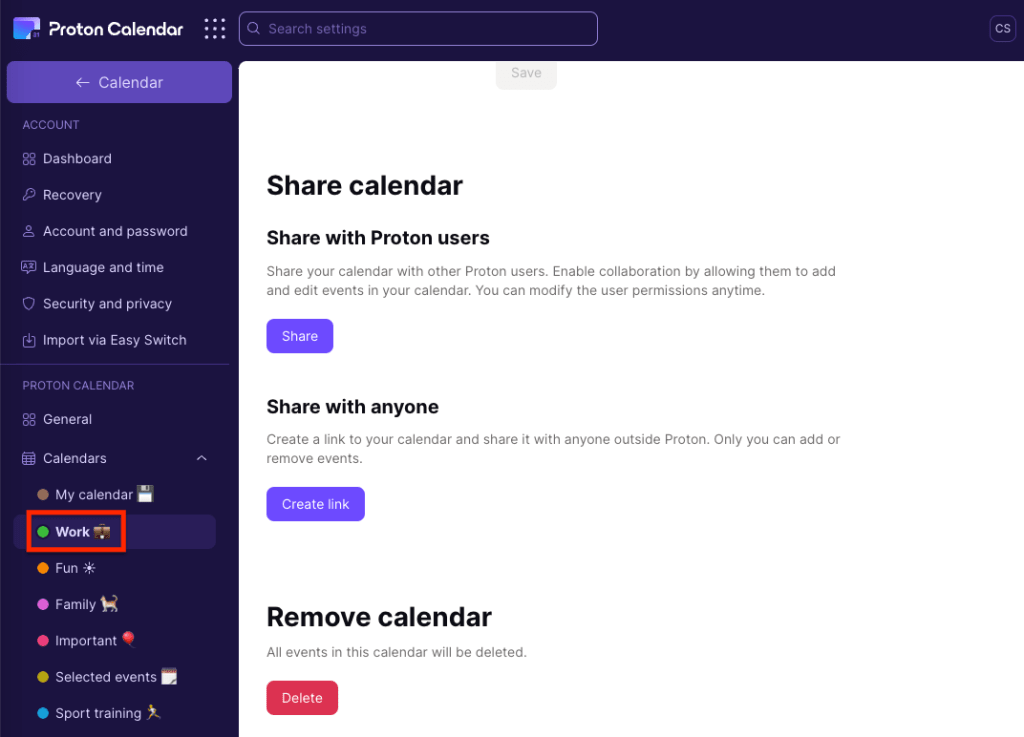
3. Under Share with Proton users, click the Share button.
4. Enter a name, email address, or contact group that you want to share the calendar with. You can add up to 49 addresses.

5. Select one of the following permissions:
- View: People invited can only view event details.
- Edit: People invited can view, create, and edit event details.

The option you choose will apply to all the people invited to share. If you want to give someone you’re inviting a different calendar permission, you can change their permission in the list of calendar members after you’ve shared the calendar (see step 8 below).
6. Click Share, and an invitation will be sent to everyone invited.

The person receiving the invitation will need to accept it to access the shared calendar.
Learn how to accept a shared calendar invitation
7. Once you’ve sent your invitation(s), you’ll see a list of the people invited under Share calendar in the calendar settings. The list will show the status of the invitation (invite sent or declined). If no status appears next to a user (for example, Kristen Novak below), that user has accepted the invitation.

8. You can change the calendar permission for individual members by choosing one of the following options in the Permissions column:
- See all event details [View]: The person can only view events.
- Edit event details [Edit]: The person can view, create, and edit events.
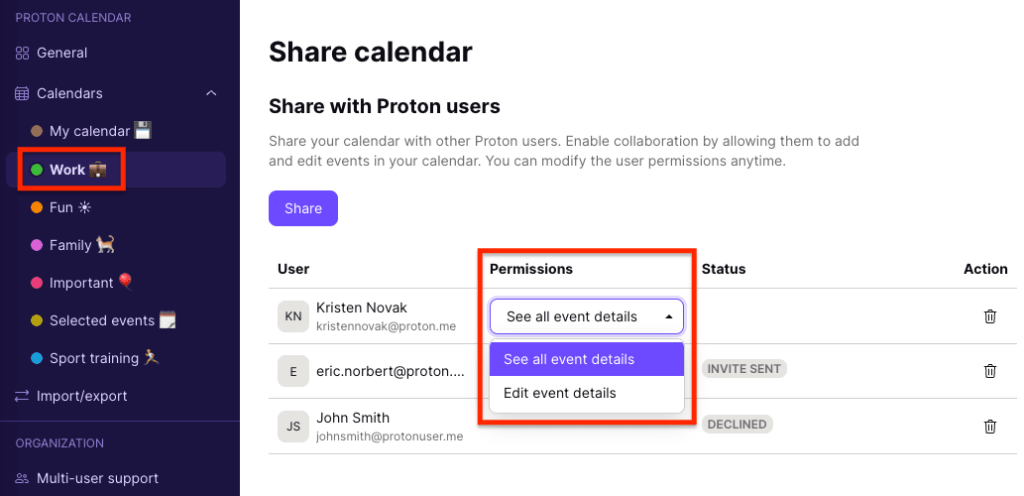
When you change a calendar member’s permission to view or edit, they receive an email letting them know their new calendar permission.
How to accept a shared calendar invitation
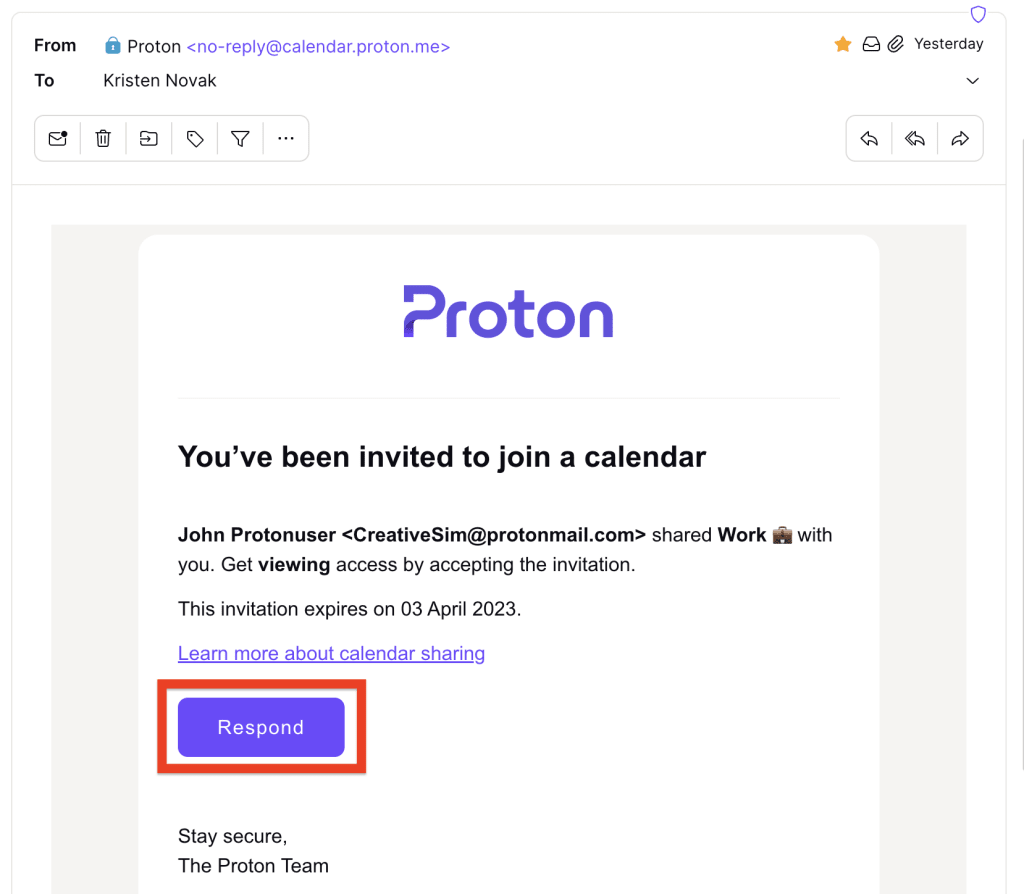
If you’re invited to join a shared calendar, you’ll receive an invitation by email. The email will show the name of the calendar, your permission (view or edit), and the expiry date of the invitation.
1. Click Respond, which will take you to your Proton Calendar.
2. Click Join calendar or No, thanks. You need to respond before the expiry date of the invitation.
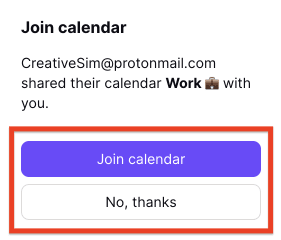
When you respond, you’ll see a notification confirming your choice: joined or declined.

The calendar you’re sharing will then appear in your list of calendars.
Any shared calendar invitations you receive will also appear in your calendar settings. To respond to the invitation, click Settings → All settings → Calendars → Other Calendars → Shared with me, and select Accept or Decline.

Note that a shared calendar is associated with the Proton Mail address an invitation is sent to. So if you have multiple Proton Mail addresses and disable one of your addresses, you’ll no longer be able to edit any shared calendars you’ve been invited to with that address.
View and Edit permissions
You can set different permissions for people you invite to share a calendar: View or Edit.
What’s View?
If you join a calendar with View permission, you can see all the calendar’s events but can’t edit them. You can also add notifications to calendar events that are set only for you.
What’s Edit?
If you join a calendar with Edit permission, you can see and edit existing events created by others sharing the calendar. You can also create and edit your own events. Any notifications you add to all events will be set only for you.
How to change View and Edit permissions
If you’ve shared a calendar with other Proton Mail users, you can change their View or Edit permission anytime.
1. Log in to Proton Calendar at calendar.proton.me(nieuw venster).
2. Click Settings → All settings → Calendars → [name of the calendar you want to share]. Or you can click the Settings icon next to the calendar.
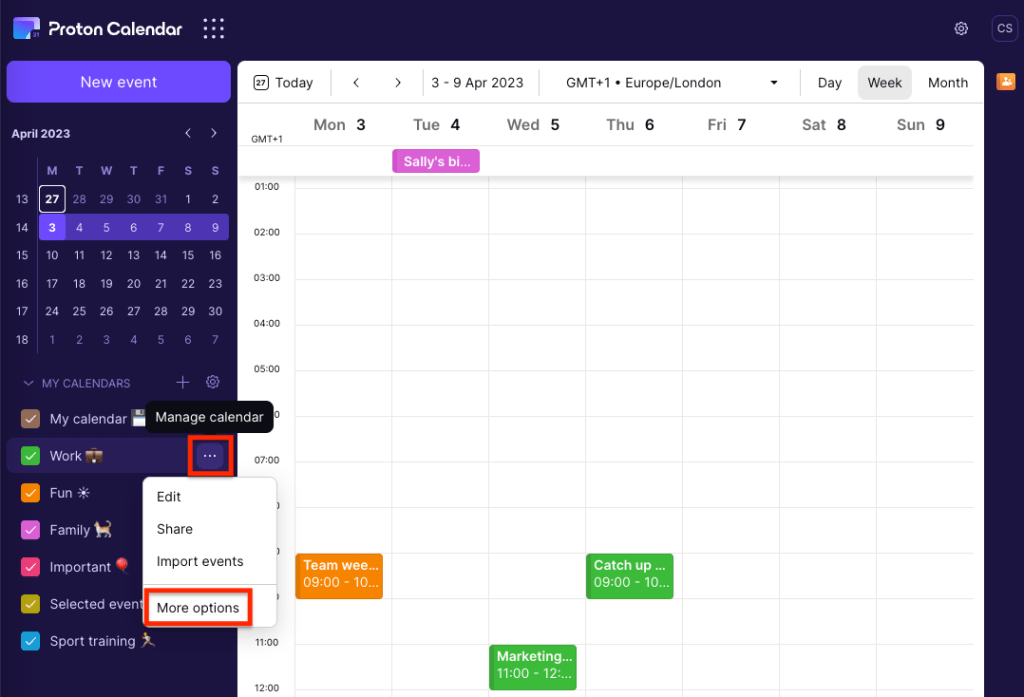
You can also click the horizontal three dots Manage calendar icon next to the calendar you want to share and select More options.
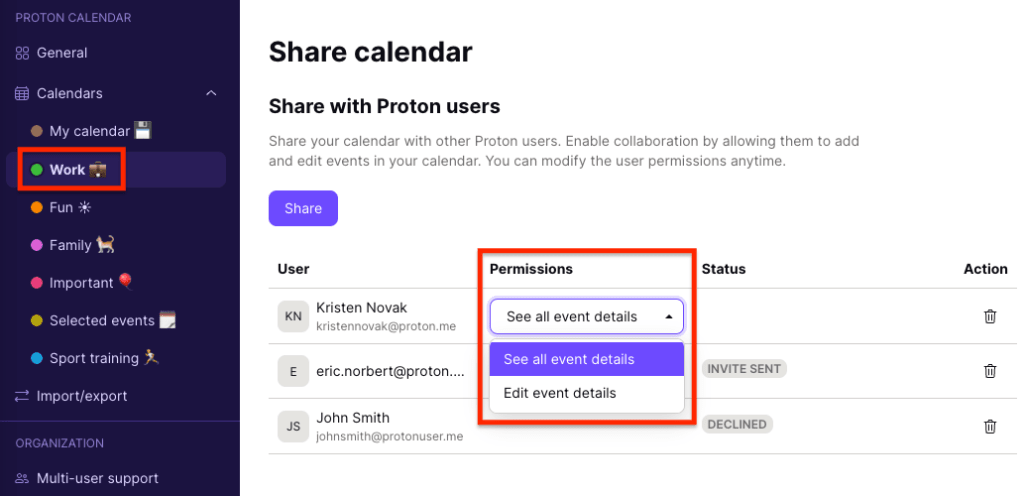
3. Under Share with Proton users, change the calendar permission for individual members by choosing one of the following options in the Permissions column:
- See all event details [View]: The person can only view events.
- Edit event details [Edit]: The person can view, create, and edit events.
When you change a calendar member’s permission to view or edit, they receive an email letting them know their new calendar permission.
How to stop sharing a calendar
You can stop sharing a calendar with someone anytime by removing them from the list of people you’ve shared it with.
1. Log in to Proton Calendar at calendar.proton.me(nieuw venster).
2. Click Settings → All settings → Calendars → [name of the calendar you want to share]. Or you can click the Settings icon next to the calendar.
You can also click the horizontal three dots Manage calendar icon next to the calendar you want to share and select More options.

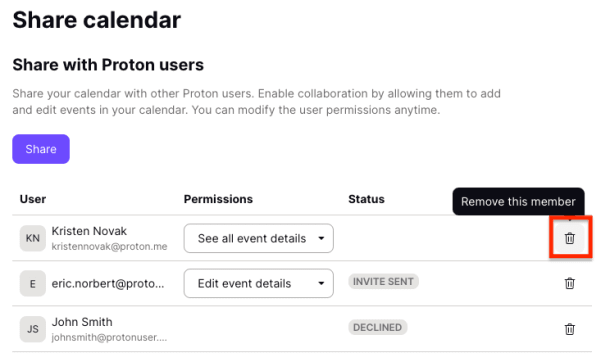
3. Under Share with Proton users, click the trash icon next to the person you want to remove from the calendar.
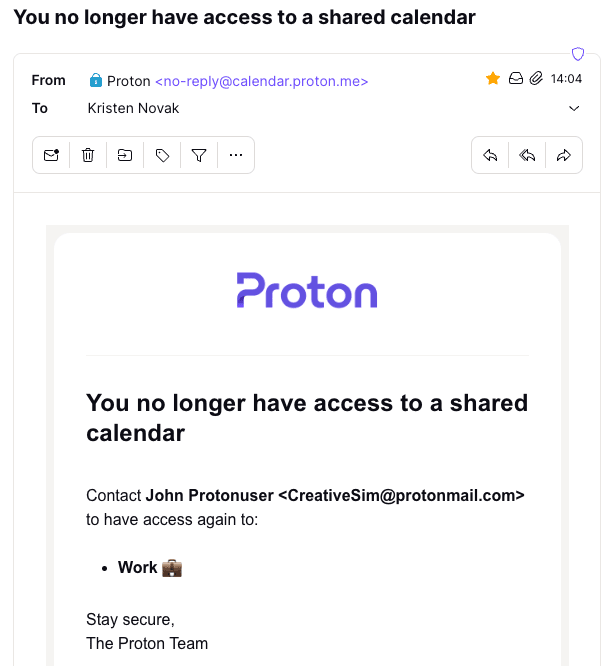
4. The person will receive an email letting them know they no longer have access to the calendar and who to contact if they want to access it again.
Shared calendars after resetting your password
When you share a calendar with other Proton Mail users, you share the calendar’s encryption key with all the added users. After you reset your password, a new key is generated for this calendar, so you need to share the calendar with them again.
When you reset your password, you’ll receive an email with the details of everyone who previously shared the calendar. You can then copy and paste their names to invite them back in one step.