Encrypting a zip file on Windows or Mac is generally more complex and less secure compared to encrypting a PDF or Excel file. While Windows and Mac have built-in tools for file encryption, they may not provide the level of protection you need, which means you have to rely on third-party apps.
Many apps can create and encrypt zip files, but only a few are easy to use and provide strong security features, such as AES-256 encryption(new window) and metadata protection. This article guides you through encrypting zip files using Proton Drive and shows how to add password protection to zip files on Windows.
- Encrypt a zip file with cloud storage
- Encrypt a zip file in Windows
- How to encrypt all your data
- FAQ
Encrypt a zip file with cloud storage
Proton Drive is a secure cloud storage app that automatically encrypts all files you upload, including zip archives. So whether you’re encrypting the zip file for safe storage or you want to share it with someone securely, encrypted cloud storage is the easiest and most versatile way to do this for most people.
Proton Drive uses end-to-end encryption(new window) to protect your files, including metadata, from hackers or surveillance. Plus, you avoid the risk of data loss from offline storage.
You can also encrypt your photos(new window), documents, and any other kind of file, not just zip files. Additionally, with Docs in Proton Drive(new window), you can create and edit documents that are encrypted by default.
Here’s how to encrypt a zip file in Proton Drive:
- Create a free Proton Account(new window).
- Go to Proton Drive(new window).
- Upload your zip file. It will be automatically encrypted.
After uploading, you can create shareable links and password-protect shared files. When sharing files(new window), you can create public links, set passwords(new window) and expiration dates, and revoke access anytime, with all links remaining end-to-end encrypted(new window).
Even if your local storage is compromised, you’ll be able to access your files from anywhere using the Proton Drive apps for the web, Windows, iPhone, Android, and Mac. The Windows apps can also sync files automatically from any folder. Plus, Proton Drive preserves a version history of your files, which helps to recover lost data or revert to an earlier version.
Encrypt a zip file in Windows
You can use 7-Zip to password-protect zip files using AES-256 encryption. However, this method doesn’t encrypt your metadata. While someone else won’t be able to access the zip file contents due to password protection, they can still see the file names, formats, sizes, and folder structure inside the archive.
Here’s how you can create password-protected zip files with 7-Zip on Windows:
- Download 7-Zip(new window) and install it on your computer.
- Launch 7-Zip File Manager.
- Select the files and folders you want to compress.

- Click Add.
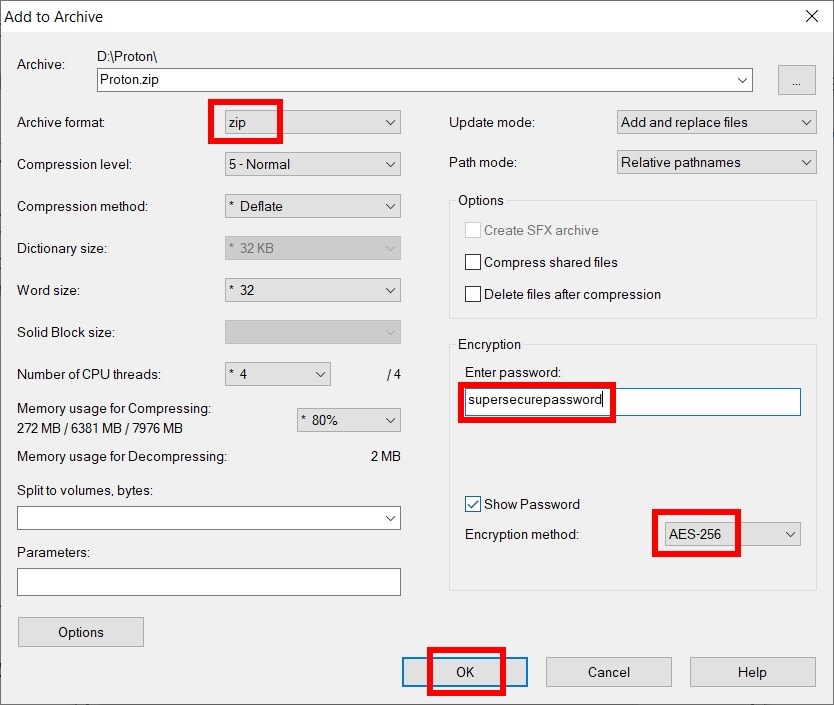
- Set the Archive format to zip and Encryption method to AES-256.
- Enter a password at Encryption and click OK.

Note: If you choose to create a 7z file instead of zip, you can configure 7-Zip to encrypt file names, which provides better security by obscuring the names of the files within the archive.
Proton offers privacy for more of your data
Encrypting your zip files is a good start to being more private online. The more encrypted services you use, the more you’ll be taking back control of your data. With other cloud storage services like Google Drive or Dropbox, the companies can scan your information.
Proton Drive encrypts your files on your device before they go to the cloud, so we never have access. All our apps are open source(new window) and independently audited. As a company based in Switzerland, we follow some of the toughest data protection rules. Plus, we use full-disk encryption(new window) to keep our servers and your zip files safe and secure at all times.
At Proton, we believe the internet should be private by default, and our mission is to help you protect yourself from surveillance and hackers. That’s why we’ve built an encrypted ecosystem for all your data, including passwords, internet connection(new window), email, and calendar.
FAQ
A zip file is a file format that combines multiple files or folders into a single, compressed file (also known as an archive). By reducing the size of the files, zip archives save storage space and make it easier to transfer groups of files, such as for uploading and downloading.
Archives were among the first types of files to introduce easy password protection for home users, which is why many people still rely on them to secure their data.
You can use the zip -e [newzip].zip [myFile].[extension] command in the Mac Terminal to create a new zip file, add the files you want to compress, and enter a password. However, this method uses(new window) an obsolete encryption algorithm that’s no longer safe, which is why we don’t recommend it in this article.
While it’s possible to encrypt zip files on Mac using 7-Zip, it involves extra steps compared to the Windows version since there’s no official graphical interface available for Mac. You have to install the console version of 7-Zip using a package manager like Homebrew, then use the 7z a -tzip -p[password] [newzip].zip [myFile].[extension] command.
Windows has an integrated feature for encrypting files using EFS (Encrypting File System), but it’s not secure. For example, if you upload and share an EFS-encrypted file through a service that doesn’t support EFS encryption, anyone can bypass the encryption and view your sensitive information.
OpenSSL, GPG, and VeraCrypt are free and support AES-256 encryption, but they are more complicated to use. For instance, OpenSSL and GPG have a command-line interface only, while VeraCrypt is designed to encrypt and hide entire volumes. These apps work locally and are typically used for hard drive encryption due to their strong security features. However, Proton Drive offers a simpler way to access your encrypted files from anywhere and securely share them with others.