
How to use a custom domain from Infomaniak with Proton Mail
- Reading
- 7 mins
- Categories
- Domain setup
- Custom email domain
If you have a custom domain (like yourdomain.com) from Infomaniak, you can use Proton Mail to send and receive emails using addresses like eric@yourdomain.com instead of eric@proton.me. Custom domains are available on all paid Proton Mail plans.
Using a different domain from Infomaniak? Find out how to use a custom domain with Proton Mail.
Here’s how to set up your custom Infomaniak domain with your Proton Mail account:
Step 1: Create your organization
When you purchase a Proton for Business plan, you’re prompted to set up your organization. If you skipped it, you can do this now by following the steps below.
If you’ve already created an organization, or if you’re not on a Business plan, skip this section.
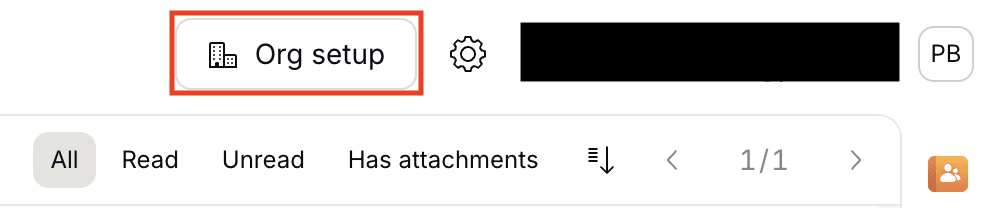
- Click Org setup in the top-right corner.
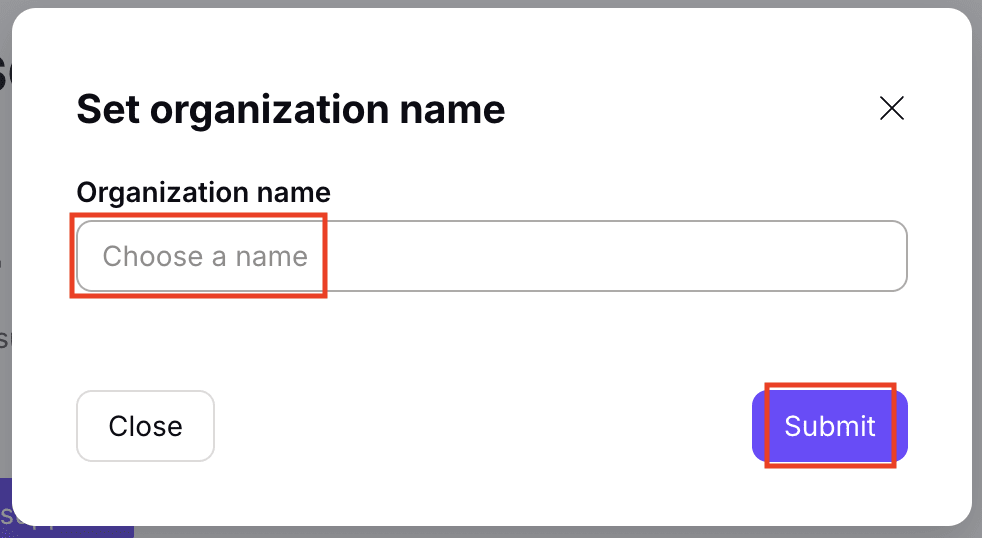
- Set an Organization name and click Submit. You can change it later.
- Allocate storage space to your administrator account and click Submit.
Learn more about setting up your organization
Step 2: Connect and verify your domain
To verify your Infomaniak domain, you’ll need to add DNS records to your domain’s DNS settings.
Note: The steps below apply only if your domain’s nameservers are set to Infomaniak DNS. If your nameservers point to another service, add the same DNS records in that provider’s DNS management console instead of Infomaniak Manager.
Follow these steps to verify your Infomaniak domain:
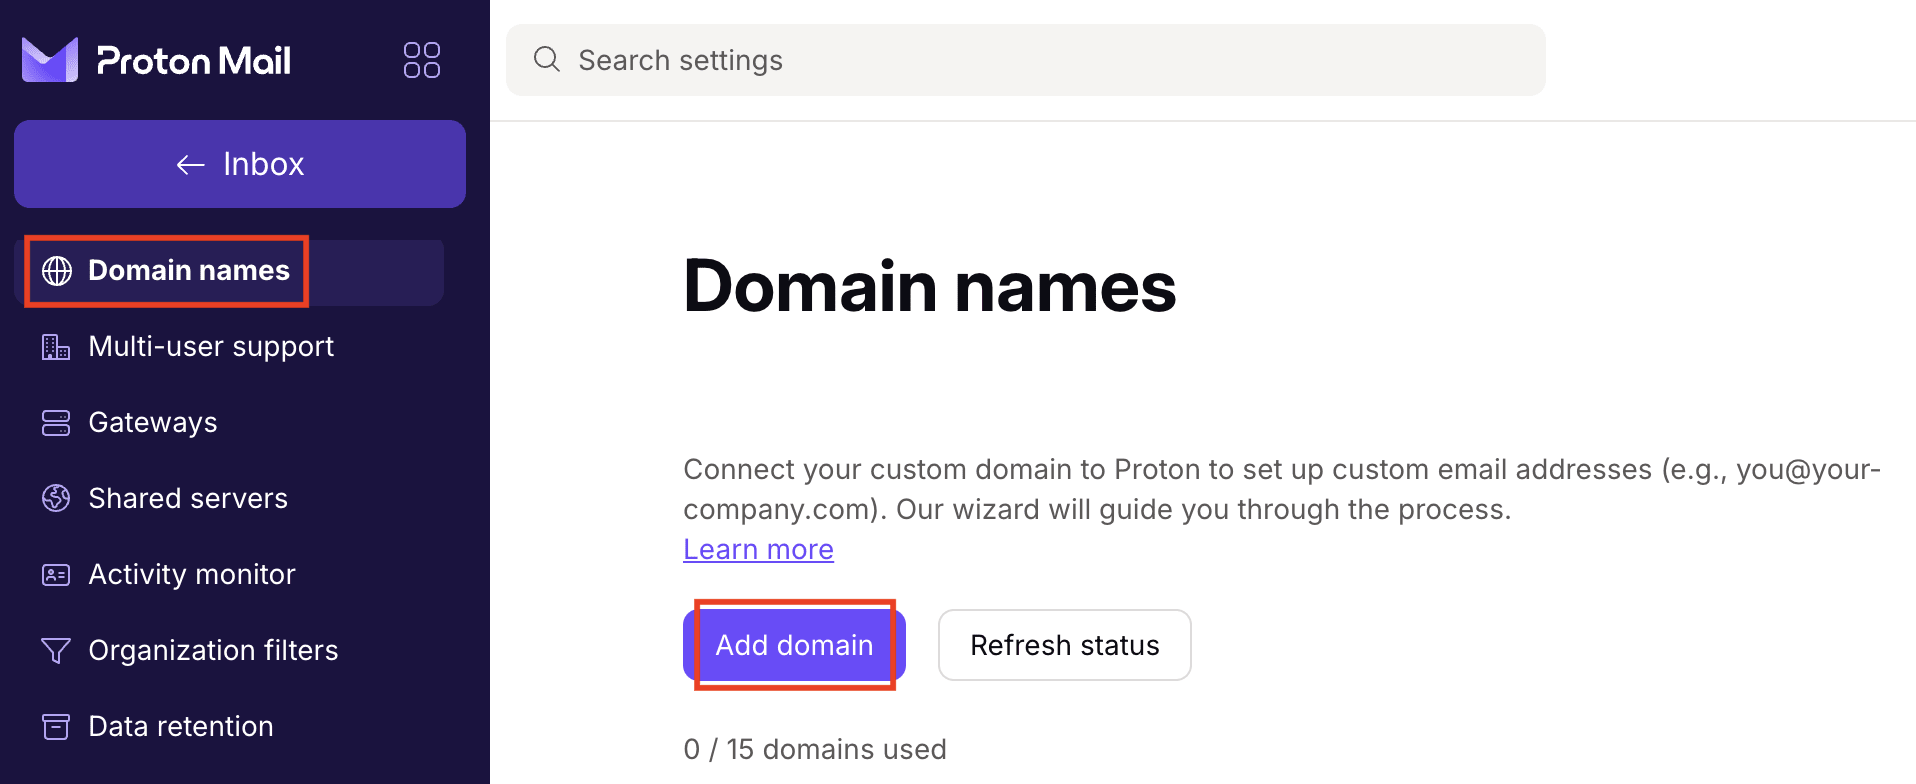
- In your Proton Mail account, go to Settings → Domain names and click Add domain.
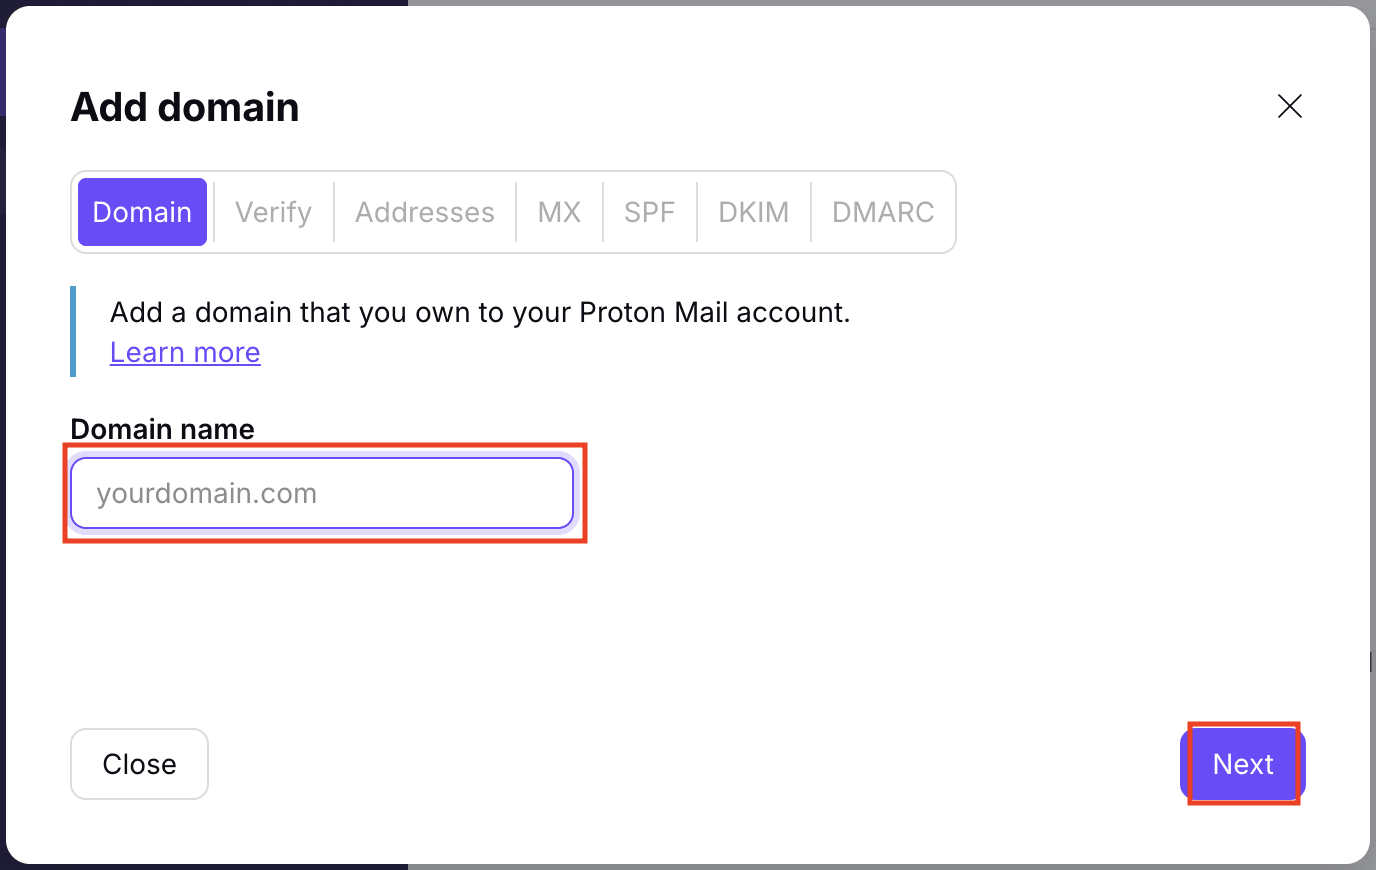
- Enter a domain name and click Next.
- Copy the TXT record, including Type, Host name, and Value / Data / Points to.
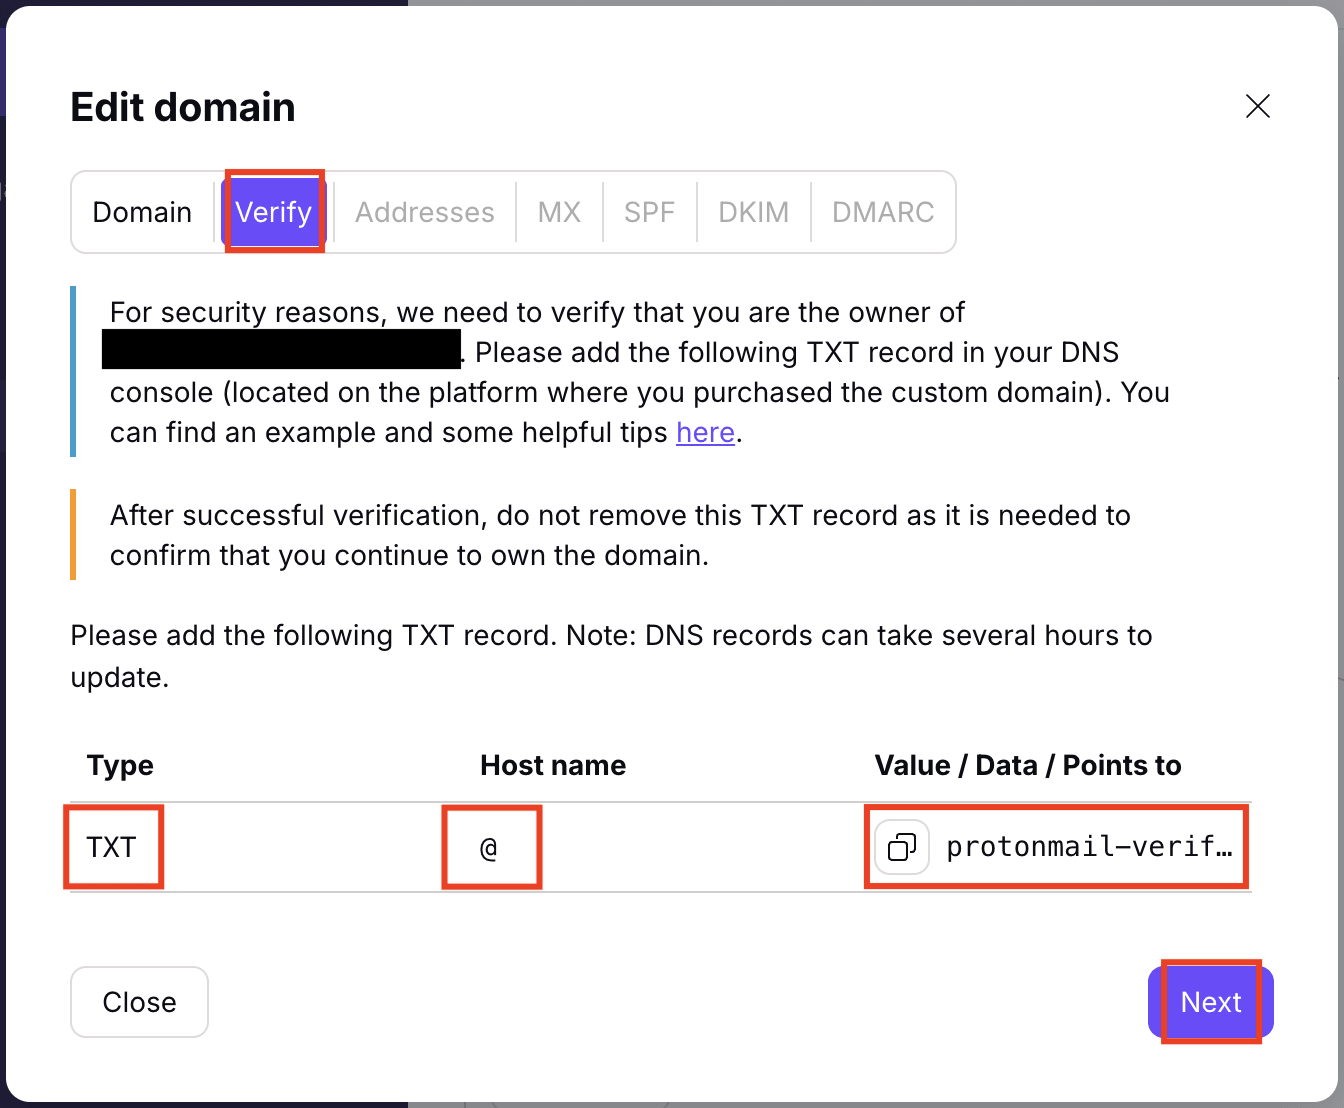
- Open a new browser tab and sign in to the Infomaniak Manager(new window).
- Click the name of the domain you want to use with Proton Mail.
- Select DNS zone from the left-hand menu. Your current records are listed in the Simple mode table.
- Click the blue Add an entry button.
- Select TXT as the record type and click Next.
- Add the following record:
- Source: Leave empty
- Target: Paste the Value you copied from Proton Mail (it starts with
protonmail-verification=) - TTL: Keep the default value

- Click Save.
- Go back to the Proton Mail domain setup wizard and click Next.
Once verified, you can move on to the next step. If verification doesn’t succeed right away, don’t worry. DNS changes at Infomaniak can take up to 48 hours to propagate, so try again later.
Step 3: Create new users and addresses for your custom domain
Before continuing, make sure you’ve purchased enough seats for the users you plan to create.
Navigate to Addresses and click Add user or Add address. This will open Users and addresses settings.
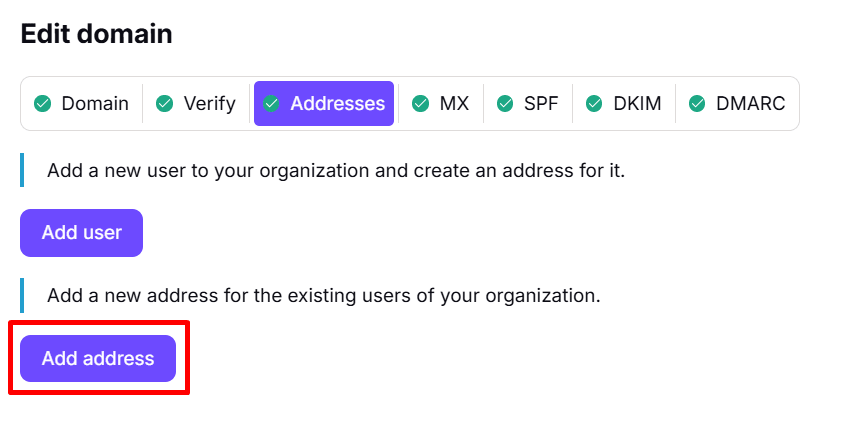
You have two options: Click Add user to create a new user account for your custom domain, or Add address to create new email addresses for an existing user.
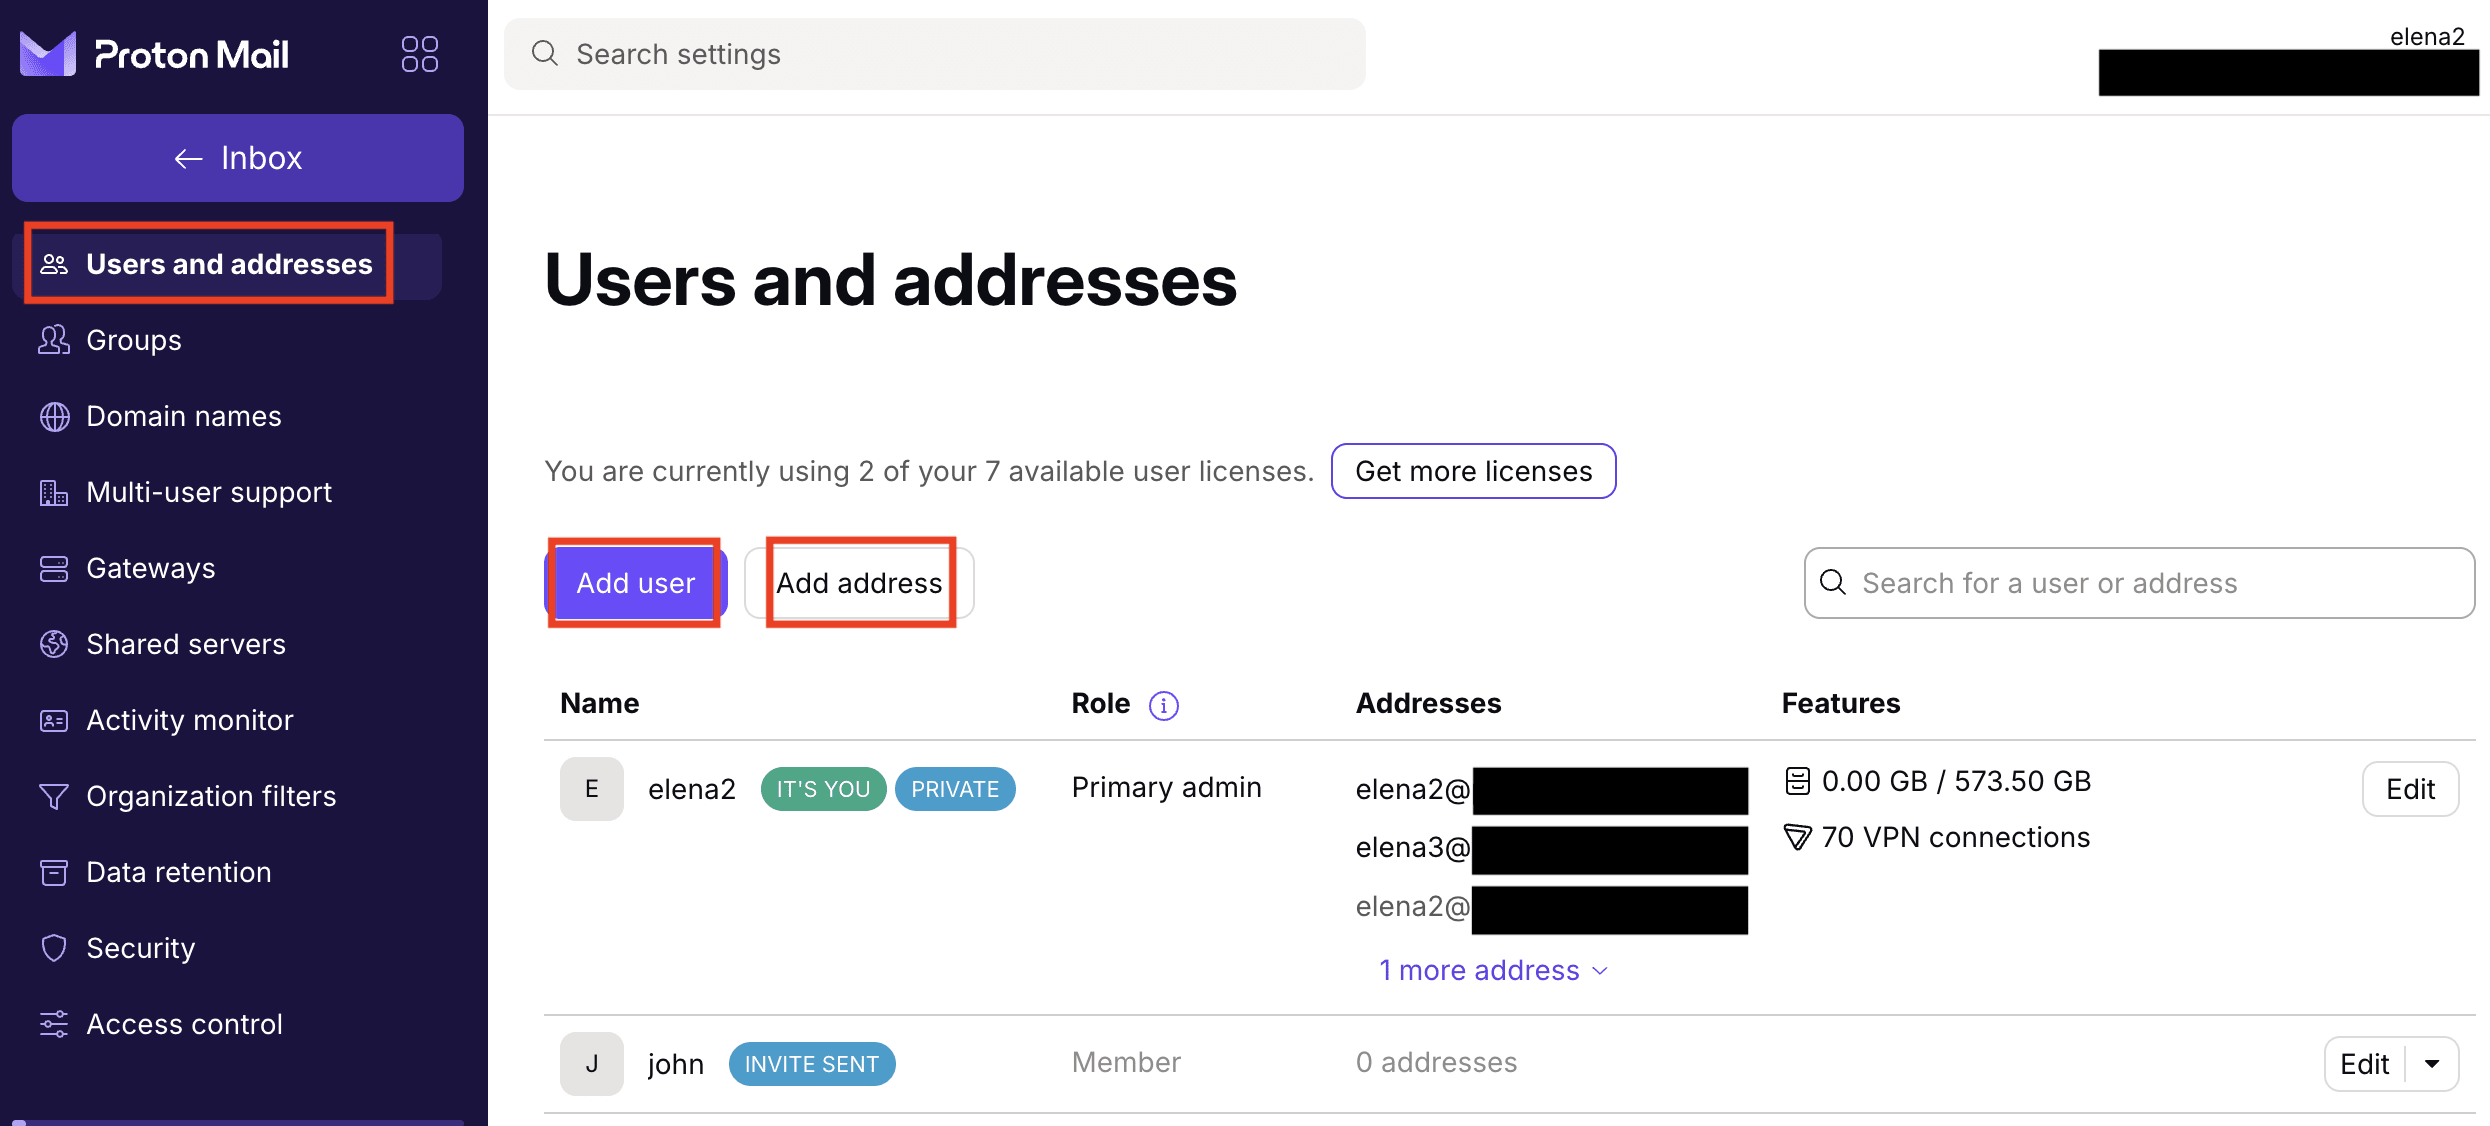
If you select “Add user”
You’ll be guided through setting up a new user account.
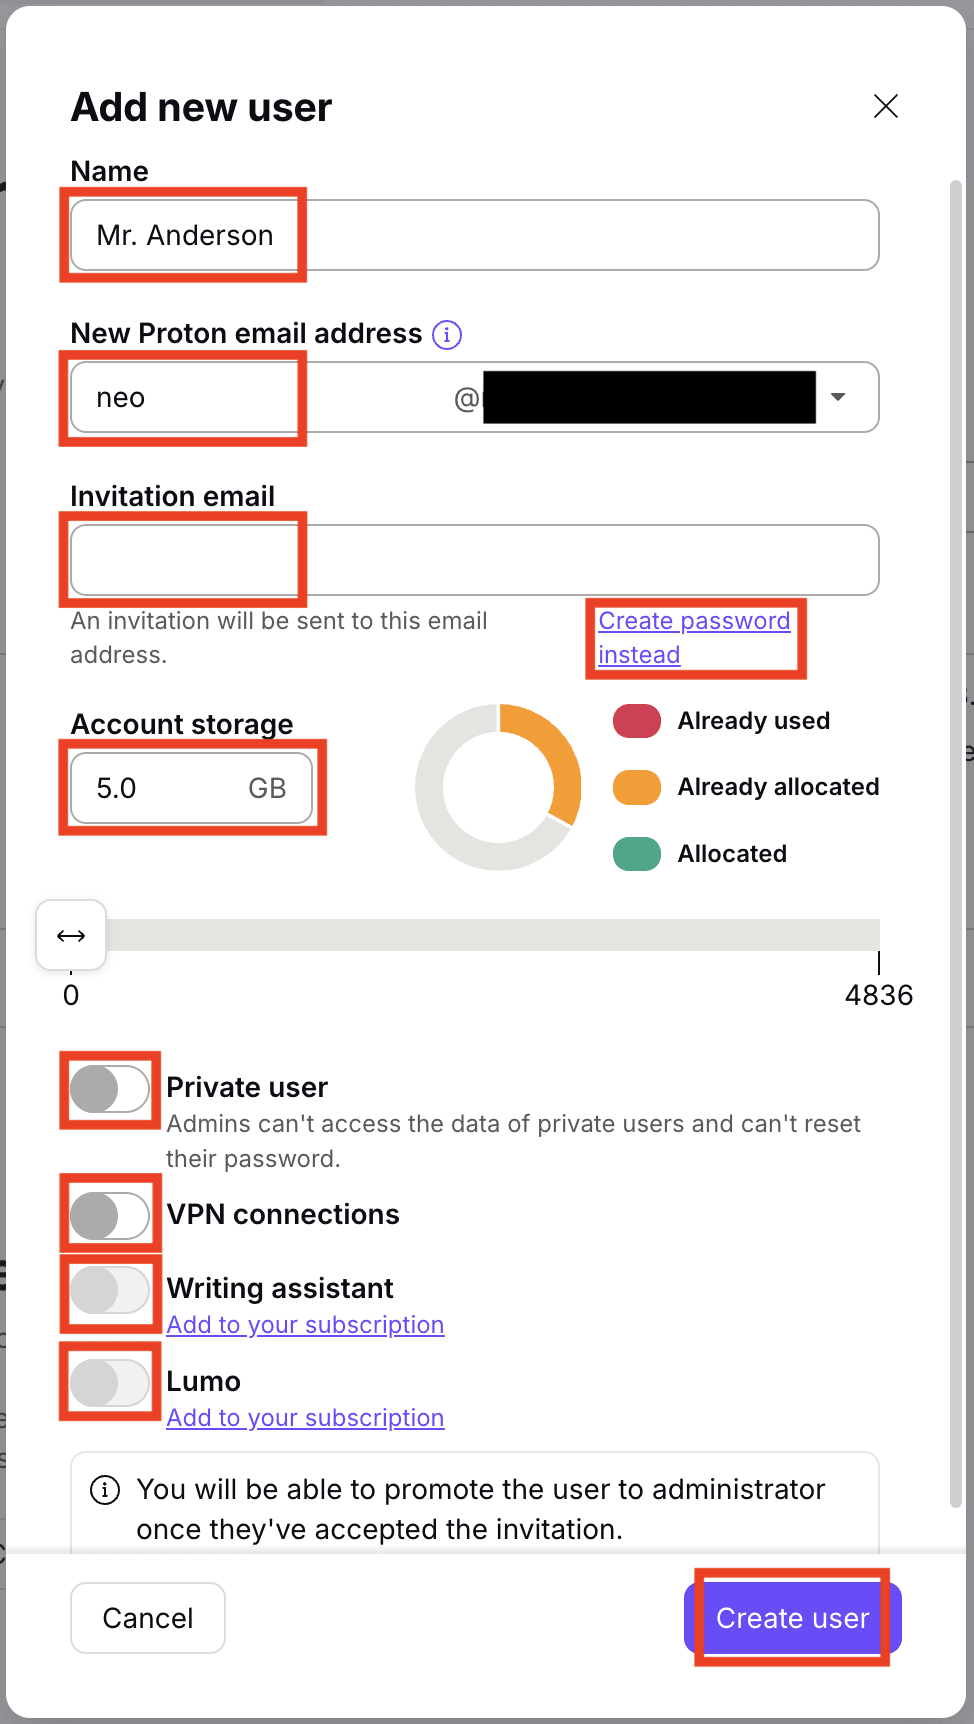
You can:
- Set the user’s name and new Proton email address
- Choose how the user gets access:
- Enter an invitation email, allowing the user to set their own password, or
- Click Create a password instead to set up a password manually, which you’ll need to securely share with the user
- Assign account storage
- Choose whether to make the user a private user. Making a user private prevents organization admins from managing the user or accessing their data. Depending on your organization’s policies, this may not be recommended. Learn more about user roles.
- Depending on your Proton subscription, you can optionally enable:
- VPN connections, allowing the user to connect remotely
- Writing assistant, providing access to Proton Scribe for proofreading or refining emails
- Lumo, granting access to our private AI assistant for business(new window)
Once finished, click Create user.
If you select “Add address”
You’ll be able to add email addresses to an existing user.
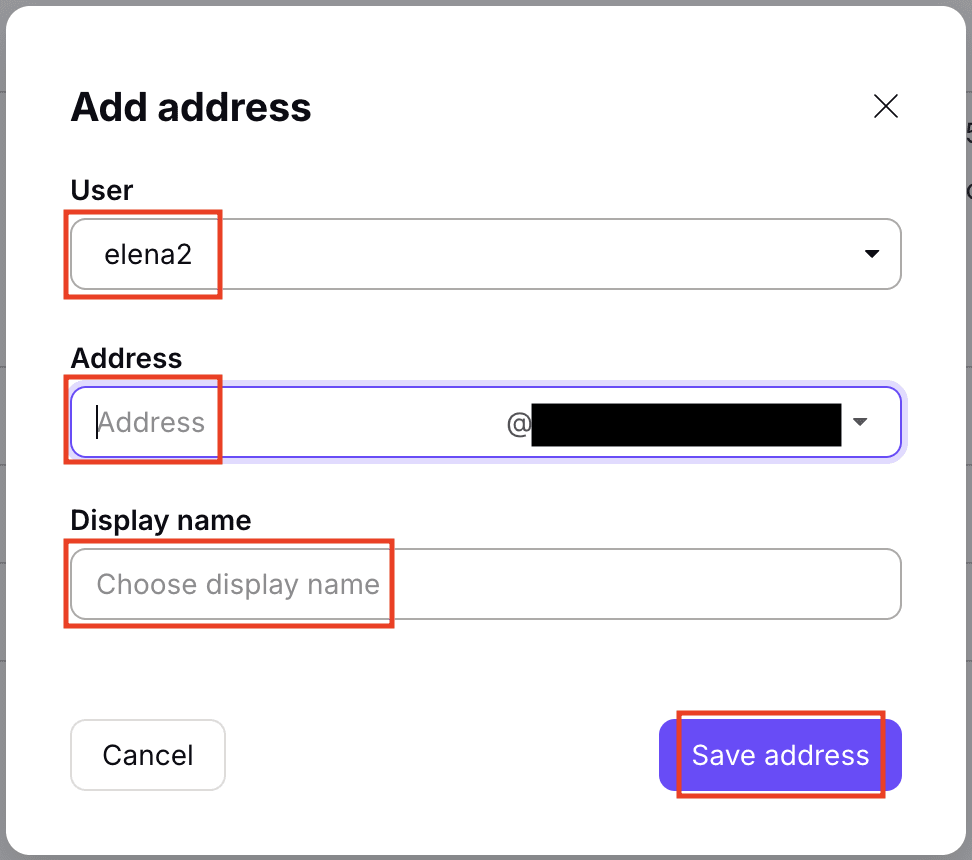
For each address, you can:
- Select a domain
- Set the new email address
- Set a display name
When you’re done, click Save address.
Learn more about adding users to your organization.
Step 4: Update MX records
Before continuing, make sure to create all user email addresses for your Infomaniak domain in Proton Mail, so no emails are lost during migration.
When you update your MX records, you’re telling the internet to deliver all incoming emails for your domain to Proton Mail’s servers instead of your previous email provider. After this change, emails sent to addresses that don’t exist in Proton Mail won’t be delivered, because your domain will no longer route mail to your old server.
To ensure emails sent from your Infomaniak domain are delivered reliably and protected against spoofing, configure MX records by following these steps:
- Go to Settings → Domain names and click Review next to your domain.

- Navigate to MX and copy both MX records, including Type, Host name, and Value / Data / Points to.
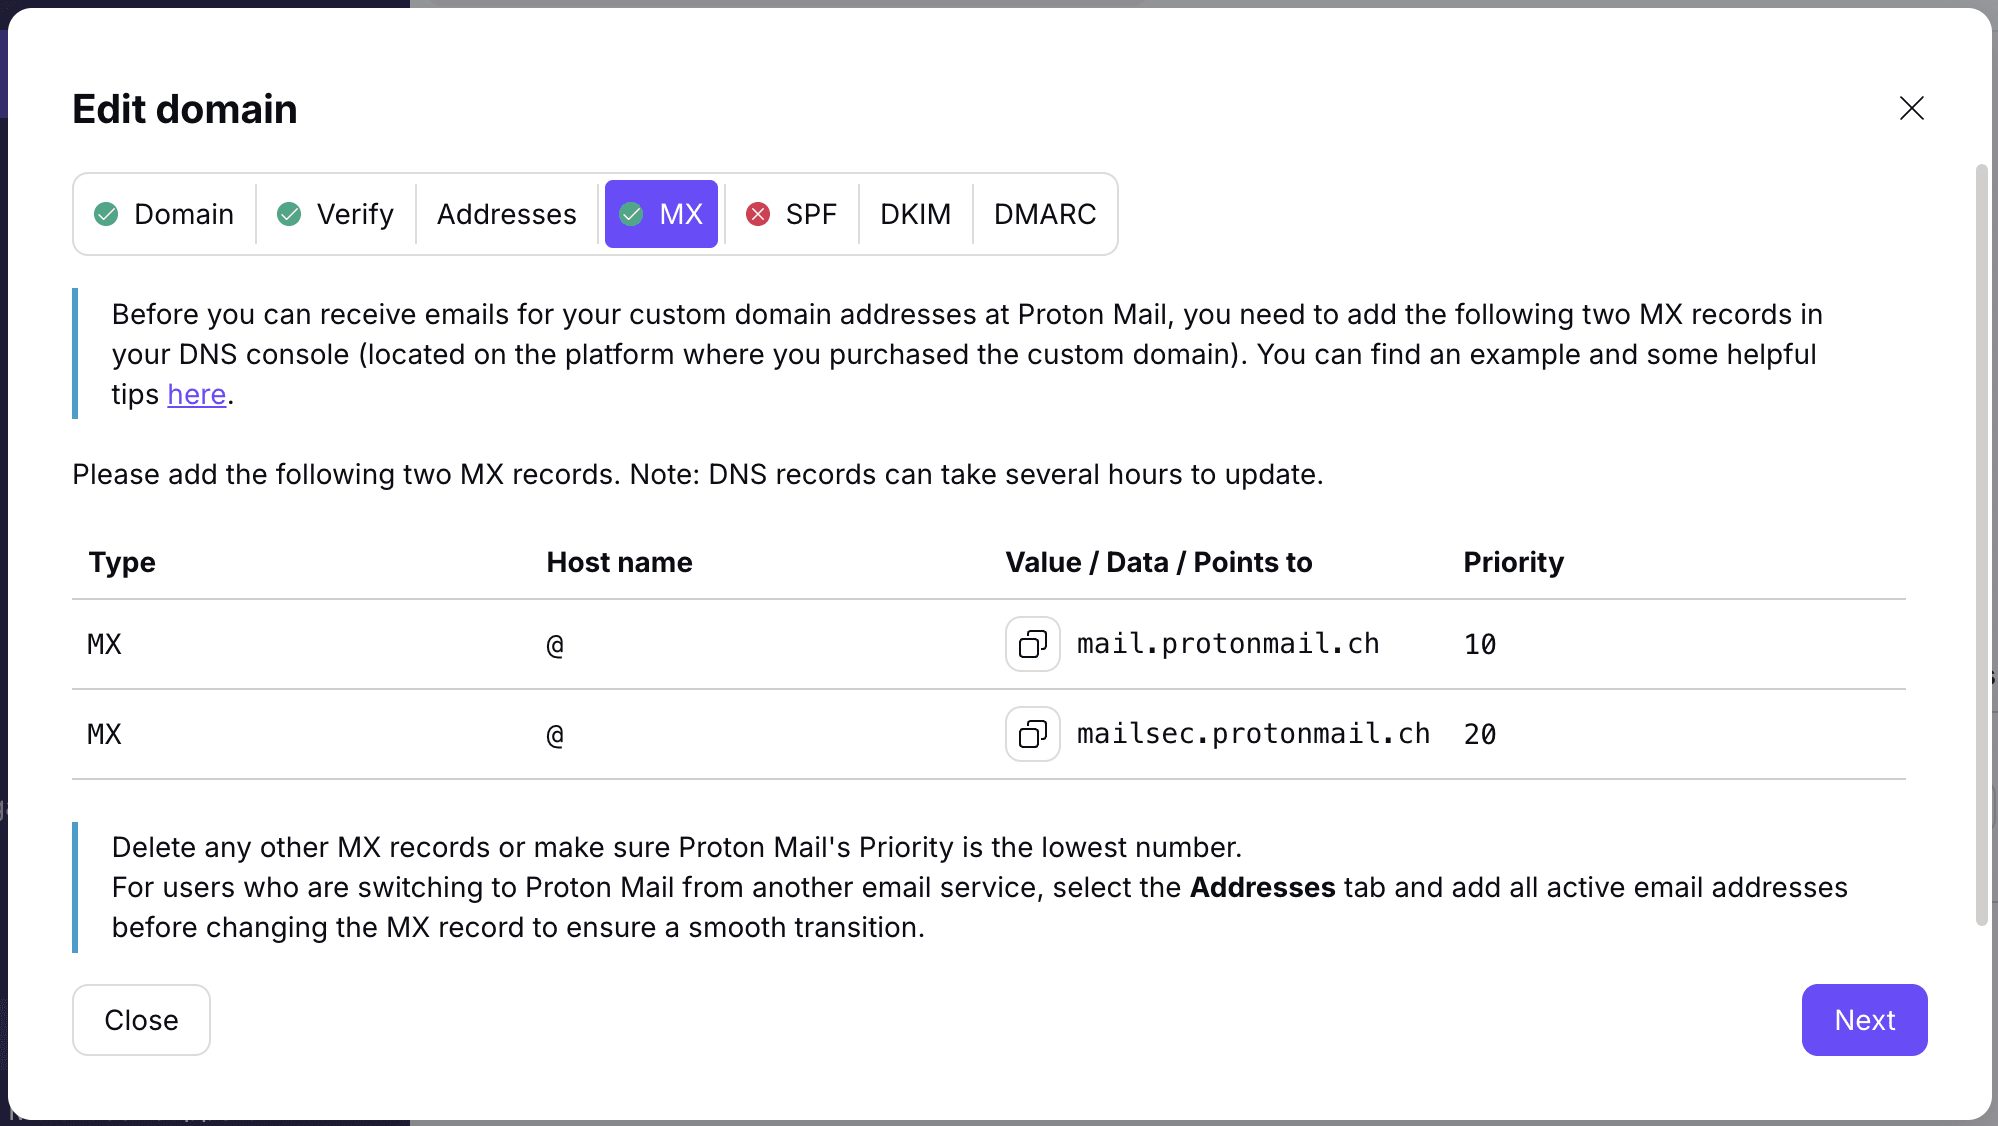
- In the Infomaniak Manager, click your domain name and select DNS zone from the left-hand menu.

- Make sure to delete any existing MX records by clicking the ⋮ menu to the right of the record and selecting Delete. If your domain was previously used with Infomaniak Mail, you’ll likely see an MX record pointing to mta-gw.infomaniak.ch.
- For each record below, click Add an entry, select the record type, click Next, fill in the fields, and click Save.
First MX record
- Type: MX
- Source: Leave empty
- Priority: 10
- Target: mail.protonmail.ch

Second MX record
- Type: MX
- Source: Leave empty
- Priority: 20
- Target: mailsec.protonmail.ch

Return to the Proton Mail custom domain setup.
If everything is set up correctly, you’ll see a green checkmark in the MX tab of Proton Mail’s domain setup wizard.
If it turns red, go back to your Infomaniak DNS zone and delete any other MX records, or make sure the Proton Mail MX records have the lowest Priority value (a lower number means a higher priority).
Click Next.
Step 5: Configure SPF, DKIM, and DMARC records
SPF, DKIM, and DMARC records help protect your domain from spoofing and improve email deliverability. Without them, your messages may be rejected or sent to spam by major email providers like Gmail.
Follow these steps to set up your SPK, DKIM, and DMARC records with Infomaniak when setting up a custom domain using Proton Mail.
SPF record (highly recommended for security reasons)
- Copy the SPF record, including Type, Host name, and Value / Data / Points to.

- Go back to Infomaniak Manager → DNS Zone and fill in the following:
- Type: TXT
- Source: Leave empty
- Target: v=spf1 include:_spf.protonmail.ch ~all
Your domain should only have one SPF record. If you find an existing one (for example, v=spf1 include:spf.infomaniak.ch -all), either delete it or modify it to use the value above.
- Return to the Proton Mail custom domain setup page and click Next.
DKIM records (highly recommended for security reasons)
In the DKIM tab, copy all three CNAME records, including Type, Host name, and Value / Data.

Then, switch to Infomaniak Manager → DNS Zone menu and fill in the following:
- First DKIM record
- Type: CNAME
- Source: protonmail._domainkey
- Target: Paste the Value/Data you copied from Proton Mail.
- Second DKIM record
- Type: CNAME
- Source: protonmail2._domainkey
- Target: Paste the Value/Data you copied from Proton Mail.
- Third DKIM record
- Type: CNAME
- Source: protonmail3._domainkey
- Target: Paste the Value/Data you copied from Proton Mail.
Make sure you add all three DKIM records. If you have trouble saving them, see Problems with configuring CNAME records.
Return to the Proton Mail custom domain setup and click Next.
DMARC record (optional but recommended)
In the DMAC tab, copy the TXT record, including Type, Host name, and Value / Data / Points to.
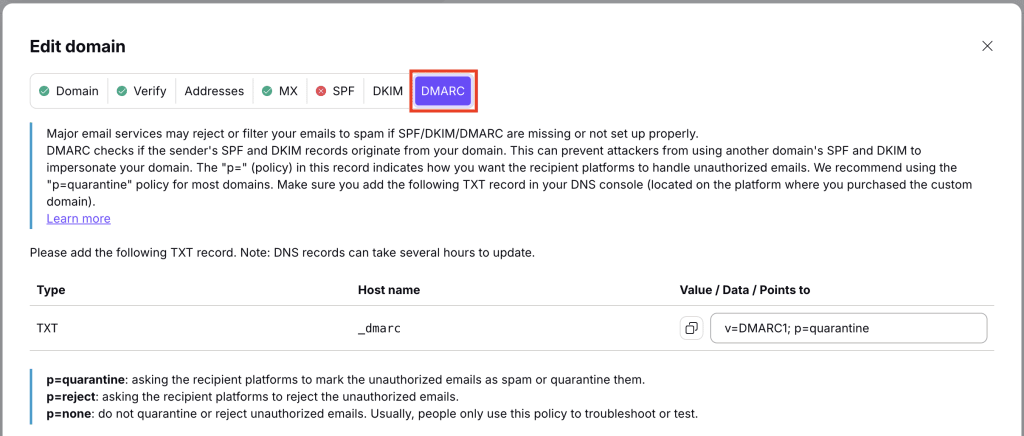
Then, switch to the Infomaniak Manager page → DNS Zone and fill in the following:
- Type: TXT
- Source: _dmarc
- Target: Copy and paste the value from the Value/Data/Points to entry in the DMARC tab.
If a _dmarc record already exists, edit it rather than adding a second one.
Return to the Proton Mail custom domain setup and click Next.
The MX, SPF, DKIM, and DMARC tabs in the domain setup wizard should all show green checkmarks. This means you can now send and receive emails using your custom domain addresses.

Tip: If a record doesn’t turn green, Infomaniak’s DNS zone has an advanced view(new window) where you can review all records at once and restore a previous version of the zone if something goes wrong.
That’s it! You can now send and receive emails using your Infomaniak domain with Proton Mail.